Take a Walk
A Quest into the Wild
Redcloud and Sunshine Peaks
Stats: 12.25 miles with 4,800 ft elevation gain; Class 2; climbed 8/2/2024.
This will be the first post in a while for our blog. We have been climbing and getting out there, but life just seems to have happened. We did climb Mt. Blue Sky and Bierstadt this year as well as some other hikes to get ready for Redcloud and Sunshine. It was a long day and we were a little tired coming back to Redcloud from Sunshine. I gave it a difficult rating for length, but we’ll have to think about a better rating system for our hikes, since they are so diverse. But let’s get into it.
We stayed in Lake City, Colorado, for this hike and drove in on Colorado 30. It is a pretty nice road and I’ve talked about it before for the hike on Handies Peak. The shelf road is still in pretty good shape and I’d say that a vehicle with good clearance can make it to the trailhead just fine. I never used 4-wheel drive in the X-terra, which we’re still driving. For fun, here’s a picture of that shelf road and of the trailhead parking lot.
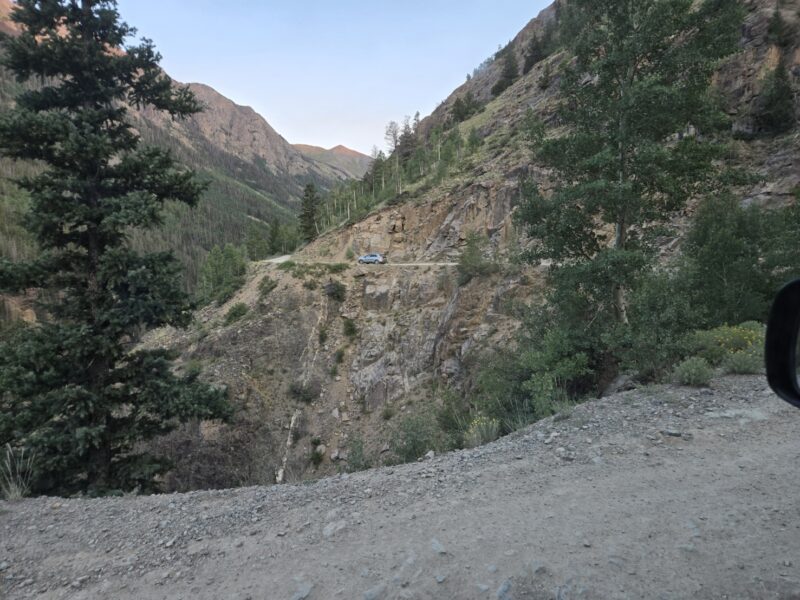
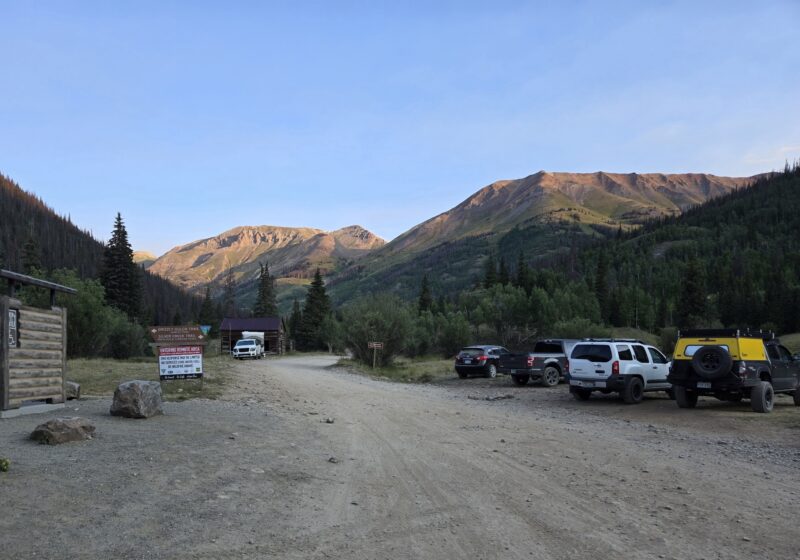
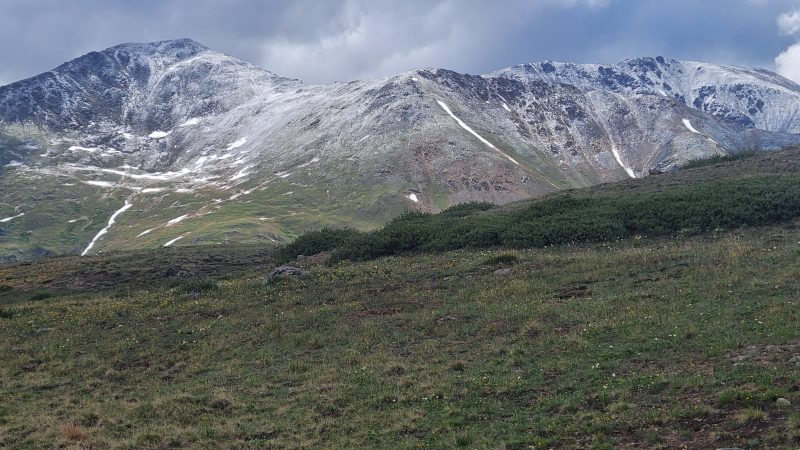
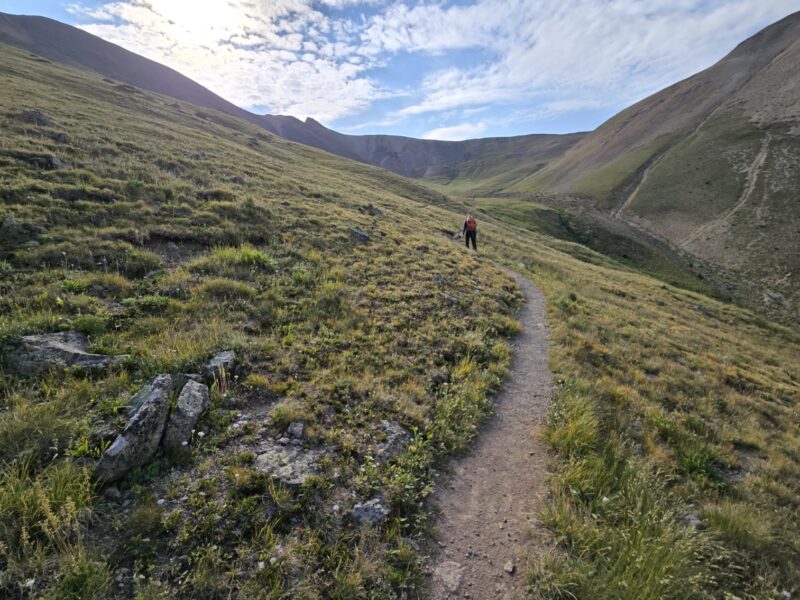
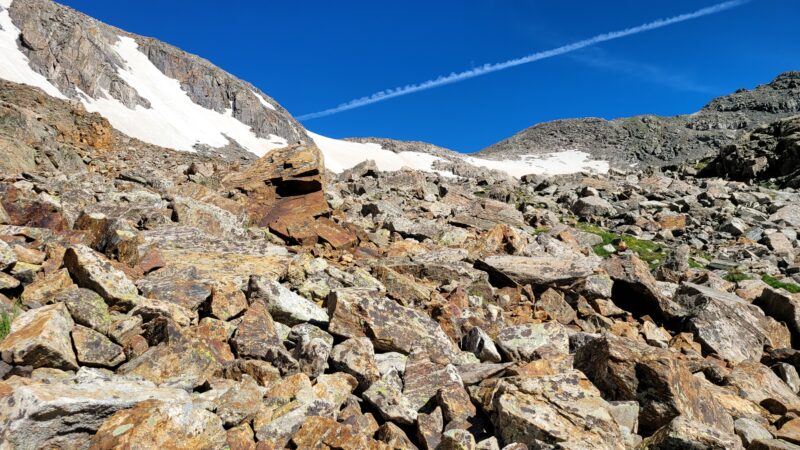
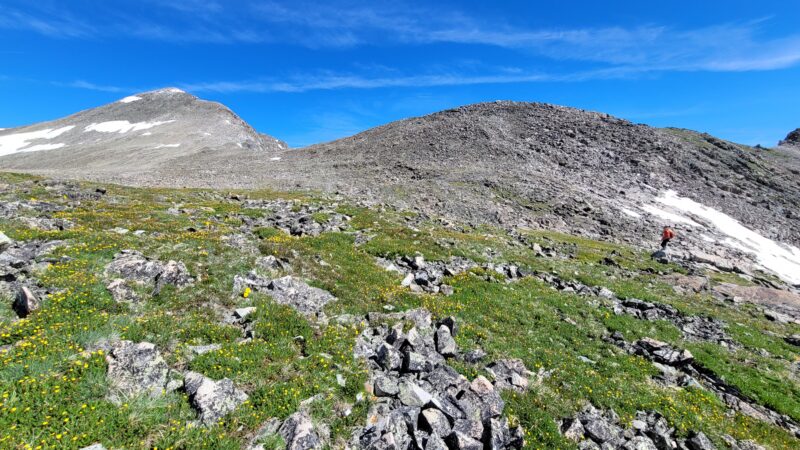
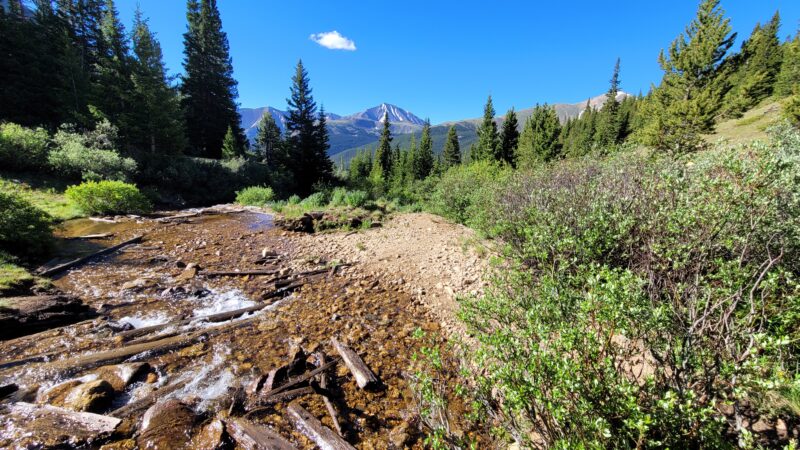
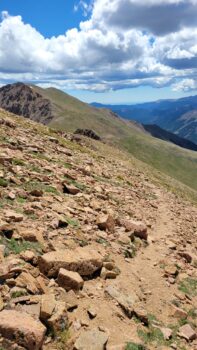
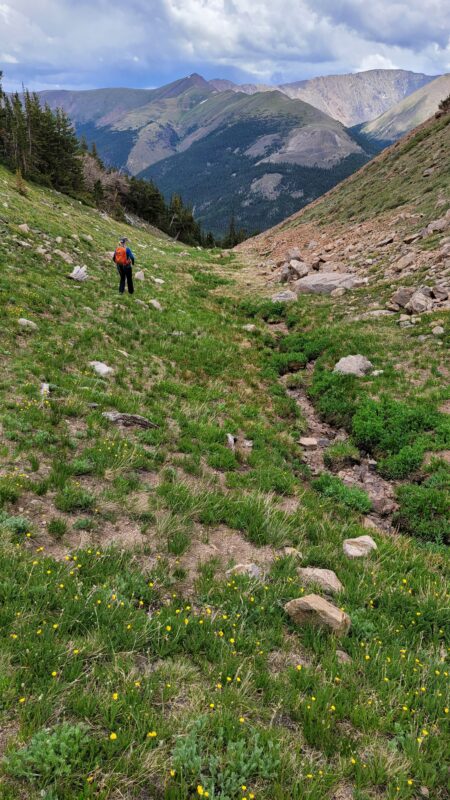
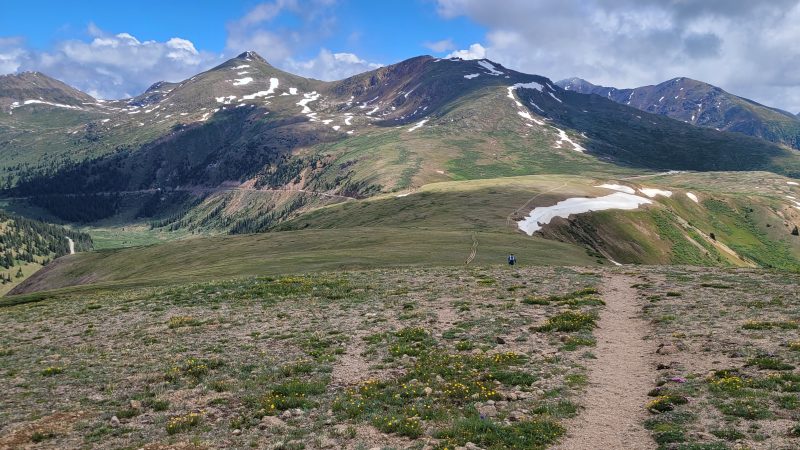
Be careful on those turns, since it is only wide enough for one car and someone is going to have to back up. Anyways, we got going at 7:11 am with a solid weather forecast and decent looking sky. I’ll say that the first quarter mile or so is pretty steep with not much of a warm-up. It is through some trees and you can hear the creek on your right. But a solid trail and I’d say it doesn’t surpass class 1 until you get to the first saddle. I have some shots below that look back towards the trees from the trail, except for the one in the middle which is looking up towards the basin.
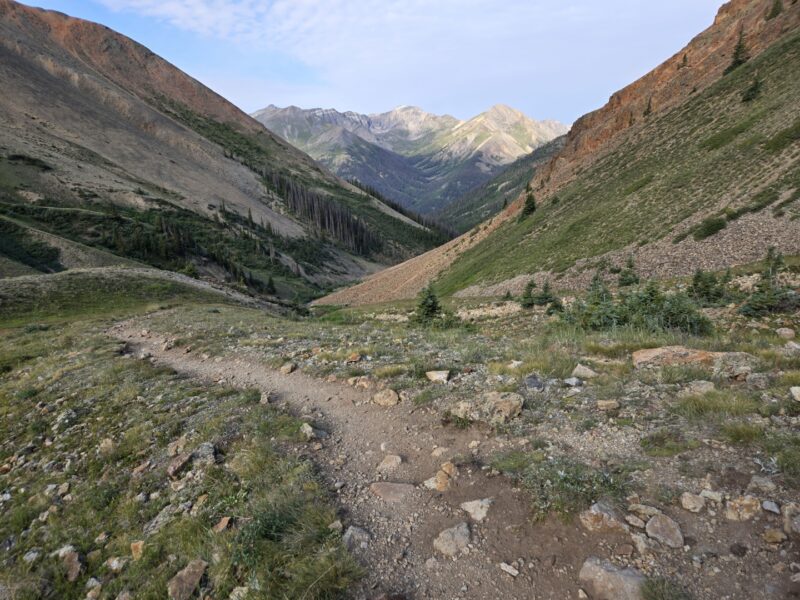
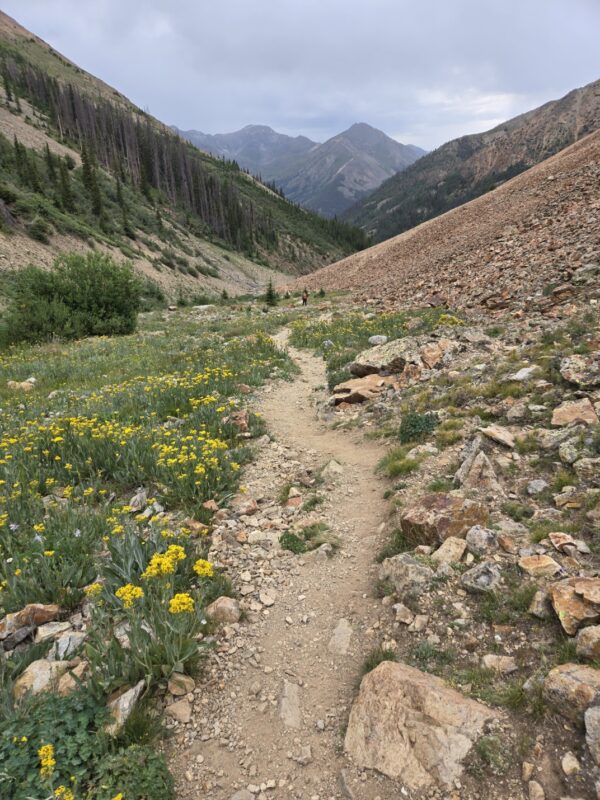
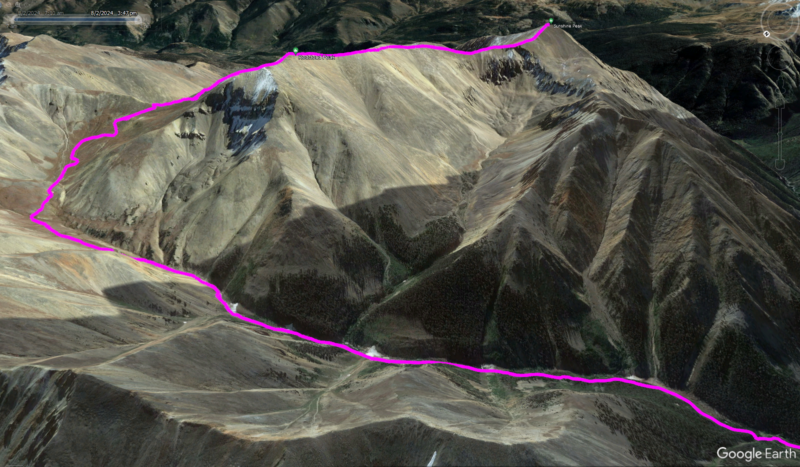
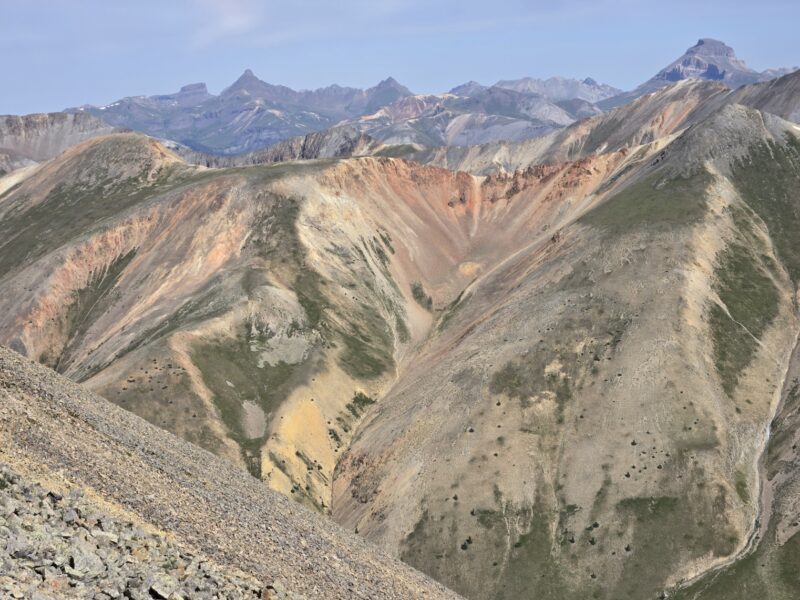
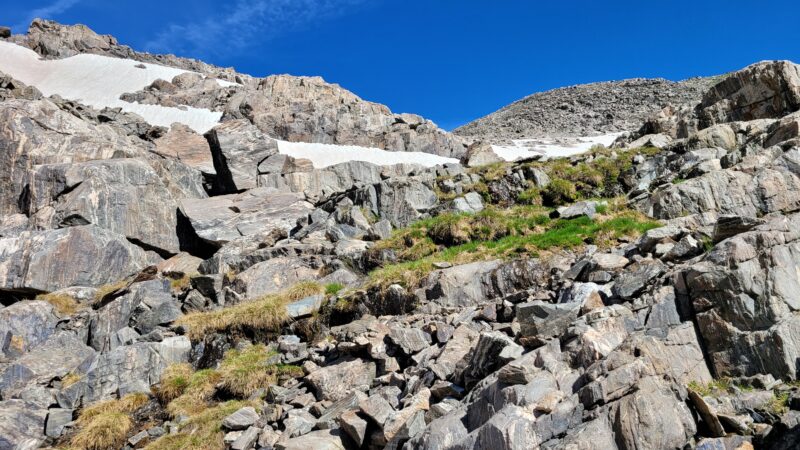
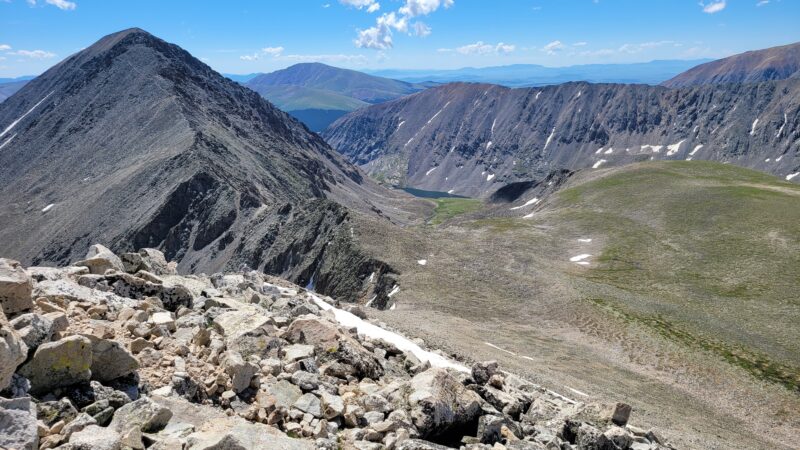
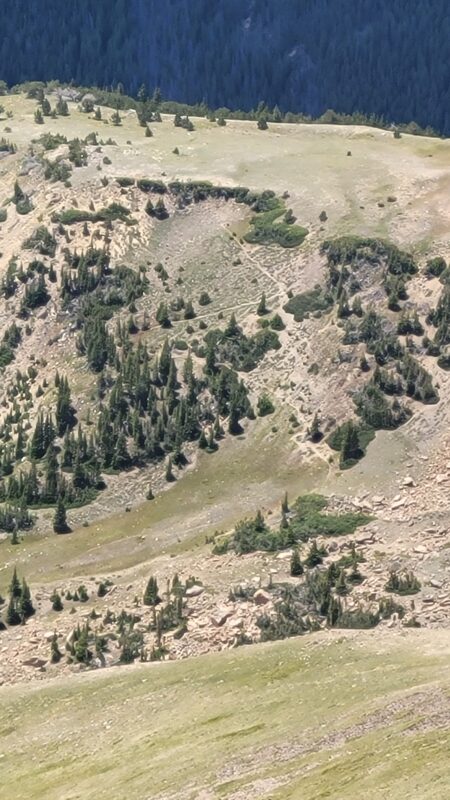
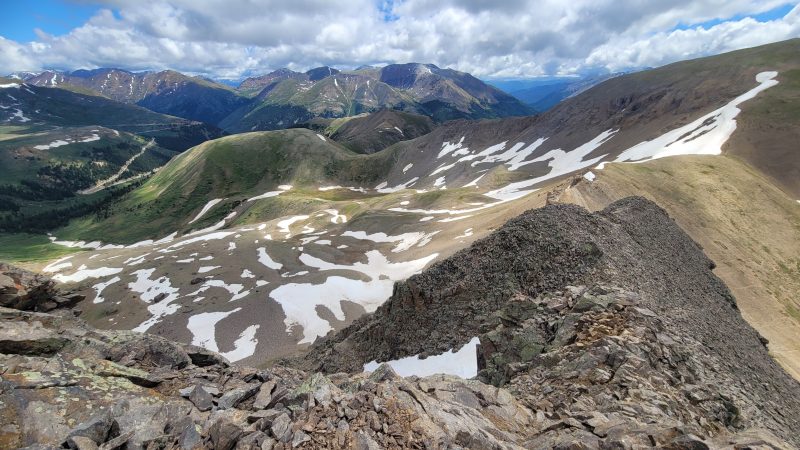
As you can see in the satellite image I put up of the hike, you make a ‘U’ shape around the basin as you head up towards the first saddle at around 13,000 feet. It was a beautiful basin and the trail was very, very nice. Lots of wild flowers were still out. We were feeling strong and loving the cool mountain air. Below are some images from that portion of the hike.
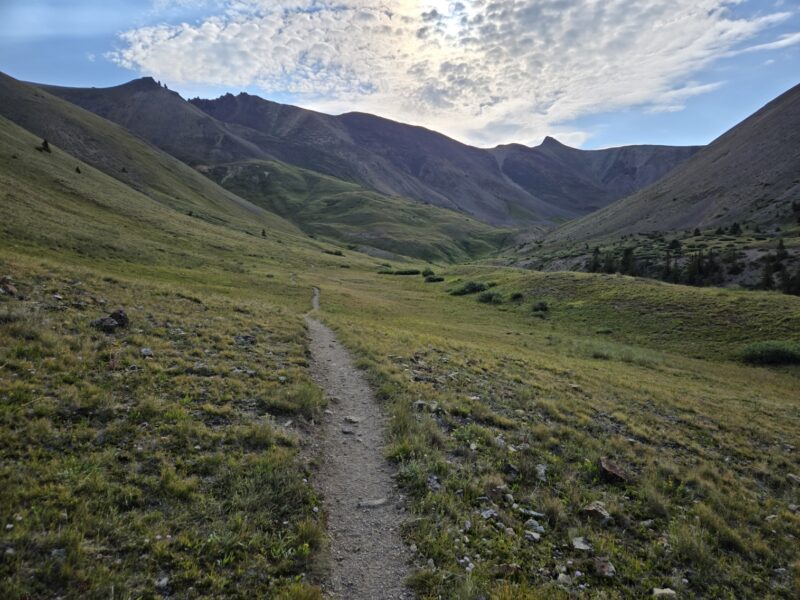
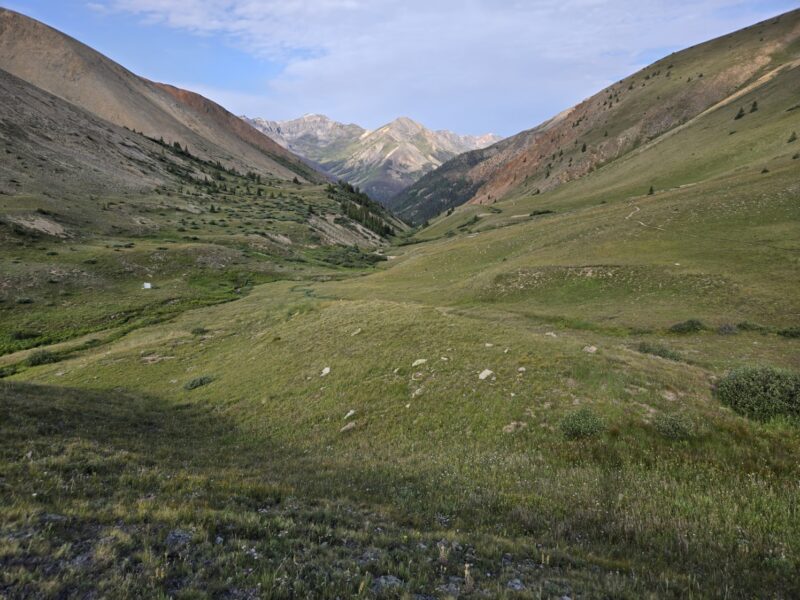
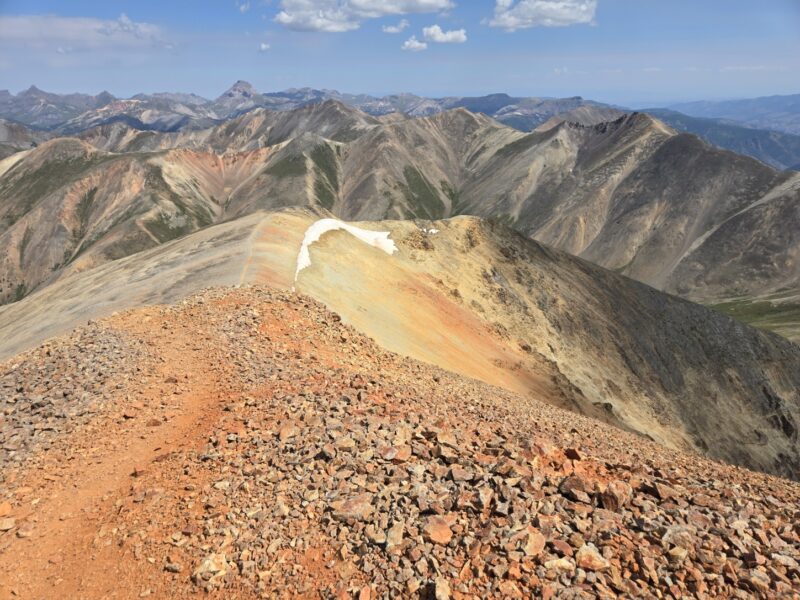
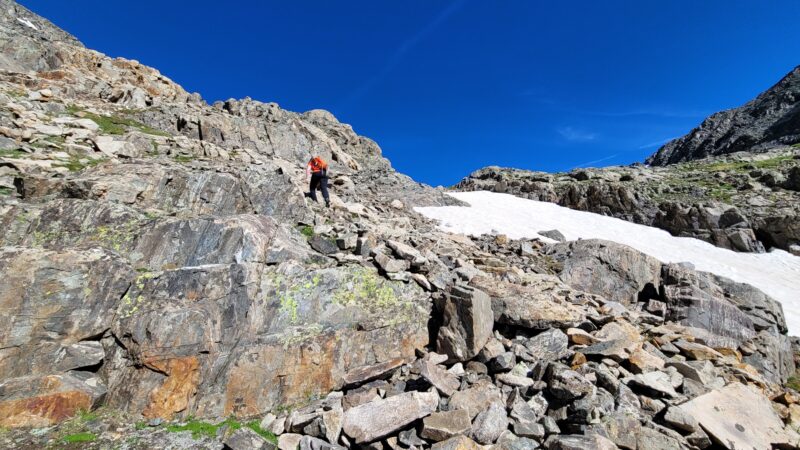
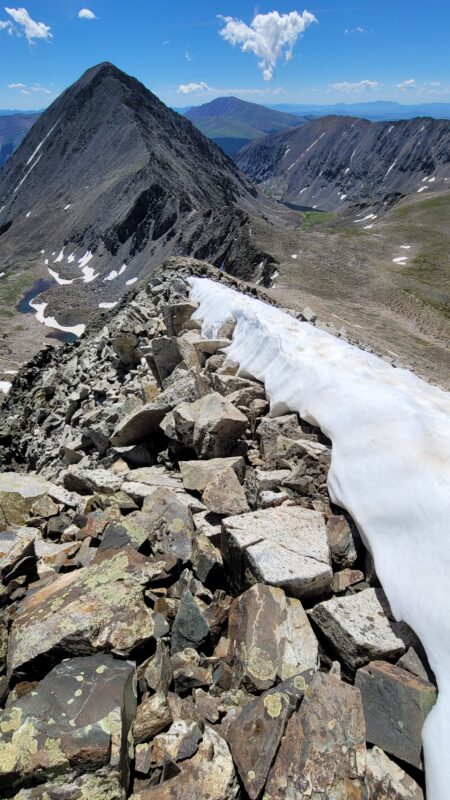
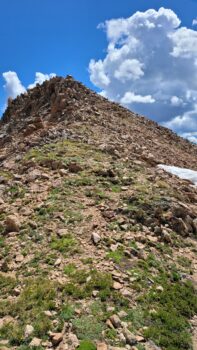
After hiking through the basin area you begin to head up steeper terrain towards the first saddle. It provides pretty views looking back at what you just hiked. At this point, you have hiked about 3 miles and it is hard to believe that Redcloud is only 1.5 miles away, though you can’t see it yet. Making your way up to the saddle you will see a large cairn at the top. Once there when you look right you will see two peaks with a saddle. The peak on the left (the big red one) is Redcloud. You are at about 13,000 feet and can see most of the remaining route to Redcloud. The images below show the view towards the remainder of the route as well as looking the opposite direction towards other non-14er options for hiking.
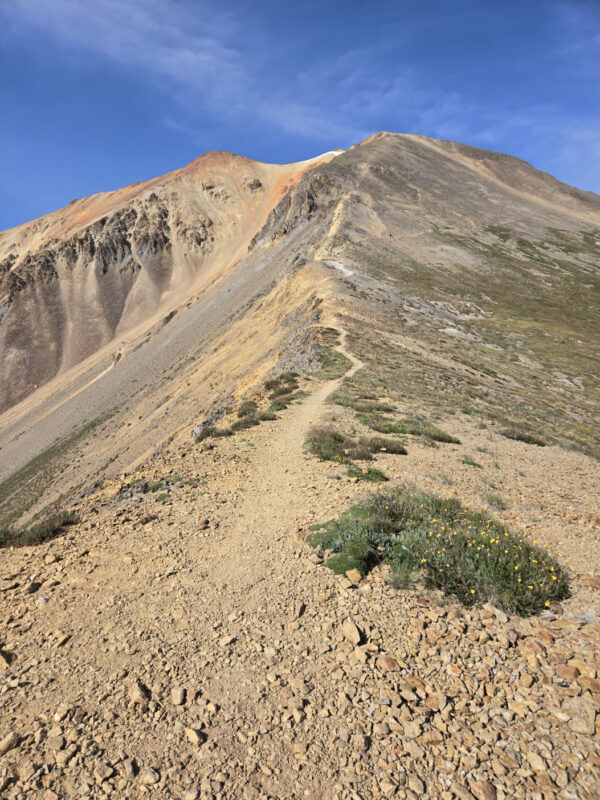
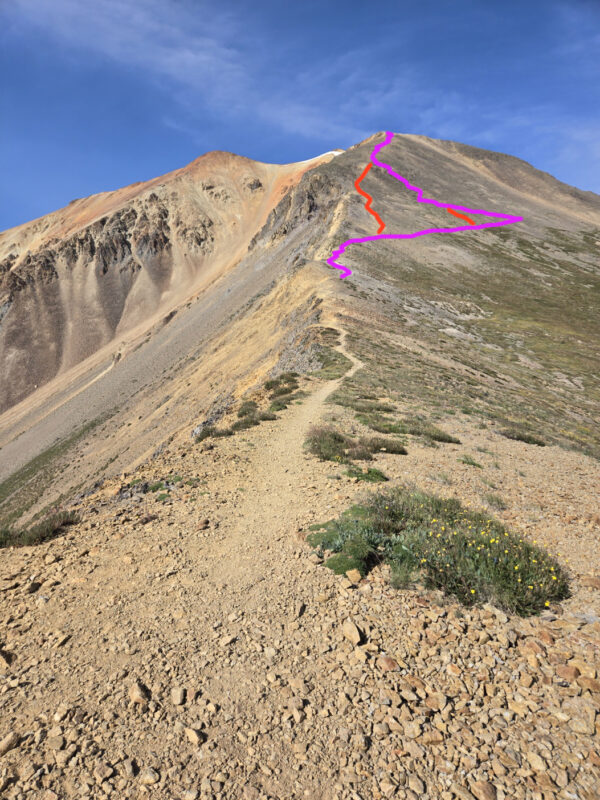
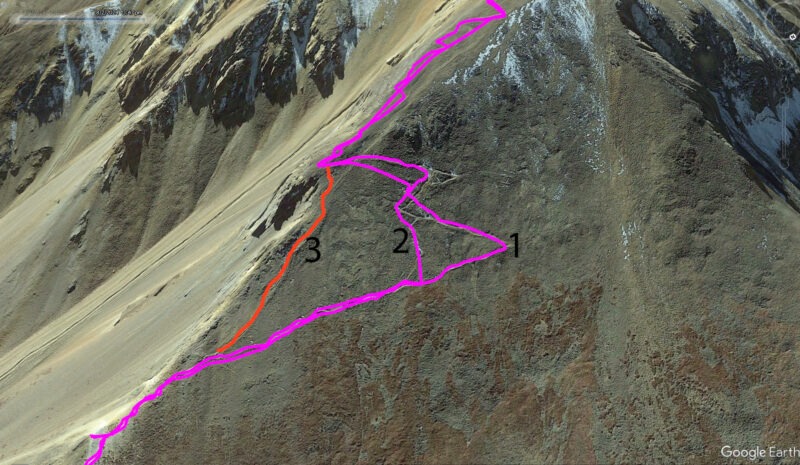
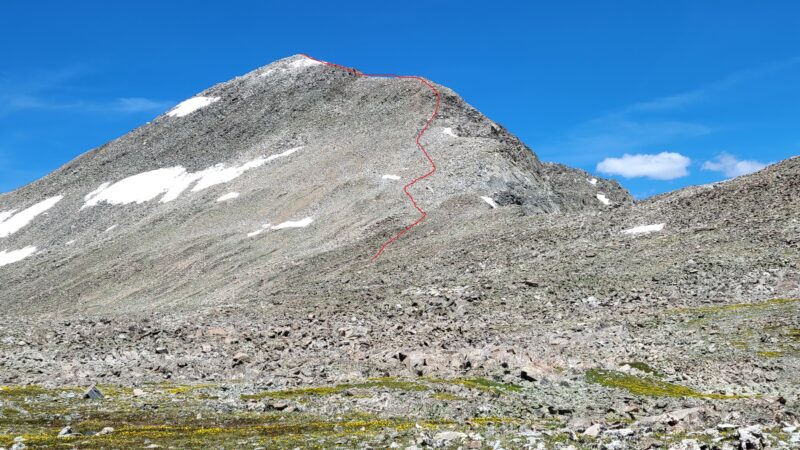
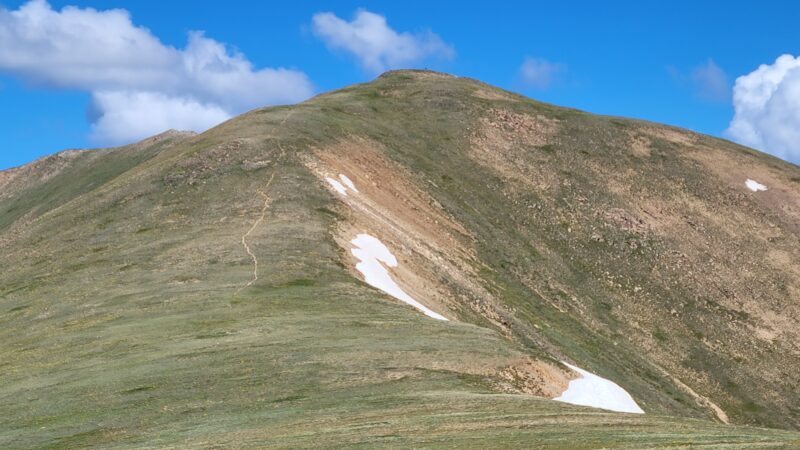
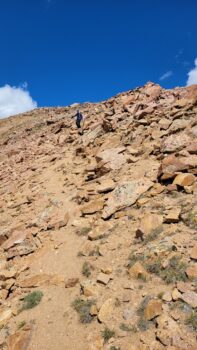
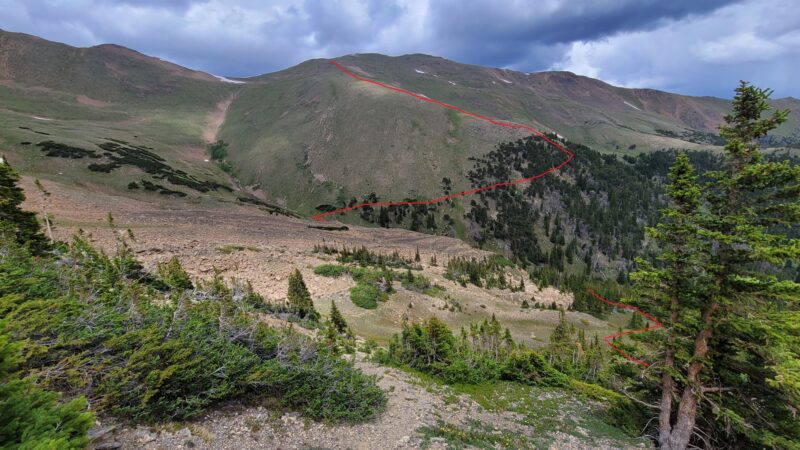
This is where I’d say the climbing changes from class 1 to class 2. This is due to some route finding you have to do going up to the false summit. I’m going to post below an image of the GPS as well as an edited picture of the hike up, since it is a little confusing as noted by a few other hikers. Alright, so there are two signs that say “Trail” with an arrow pointing to the correct (or official) route. The signs are at the base and top of the route labeled 3 in red on the image on the right, which is why that is not the “correct” way. The official route is the path labeled 1 in the image on the right. Route 2 is what we accidentally took on the way down when we turned too early on a byway trail. It was very loose and rotten and not a good path. I will say I saw hikers on all 3 of these and let’s face it, none of them are going to get you into class 4/5 climbing, but in an effort to minimize erosion and keep the trails nice I’m posting this here. Bill Middlebrook has similar images on 14ers.com.
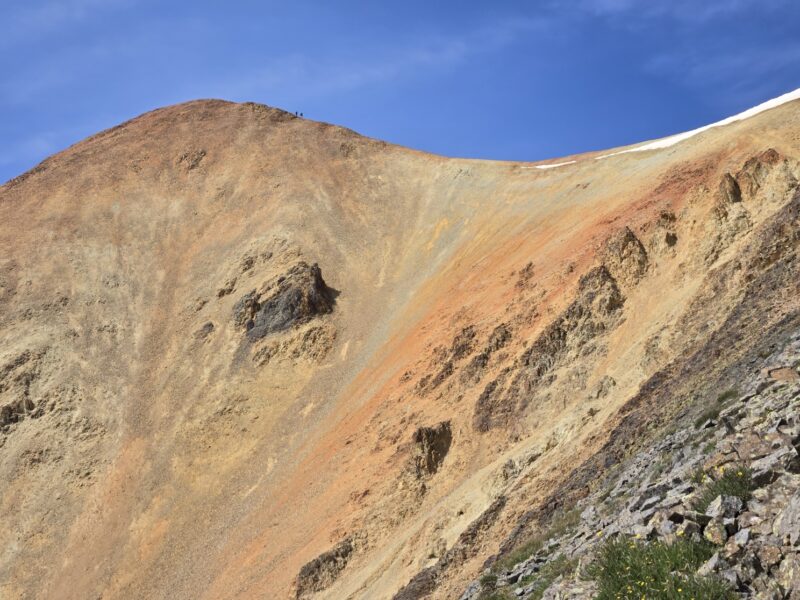
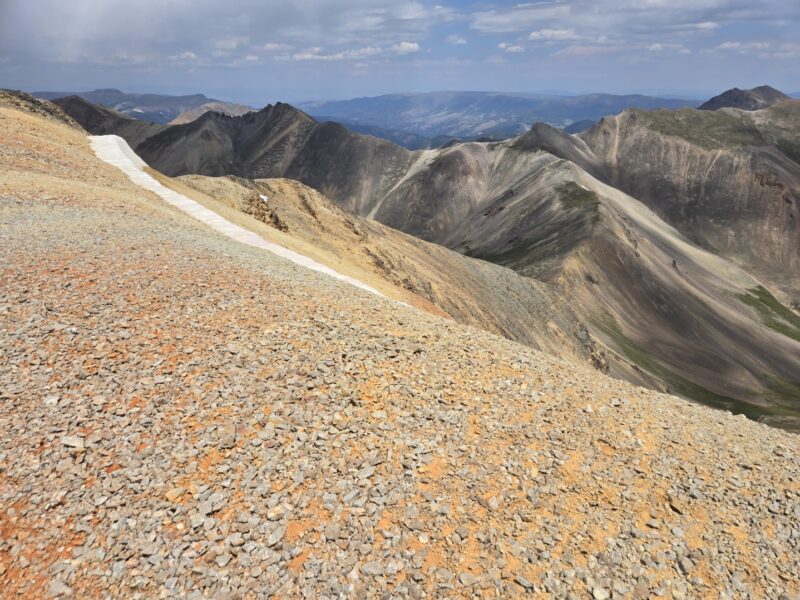
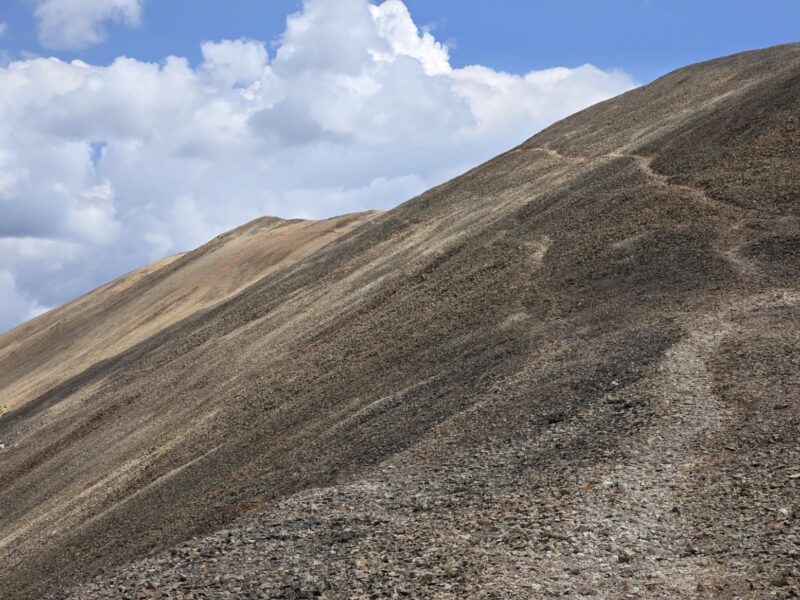
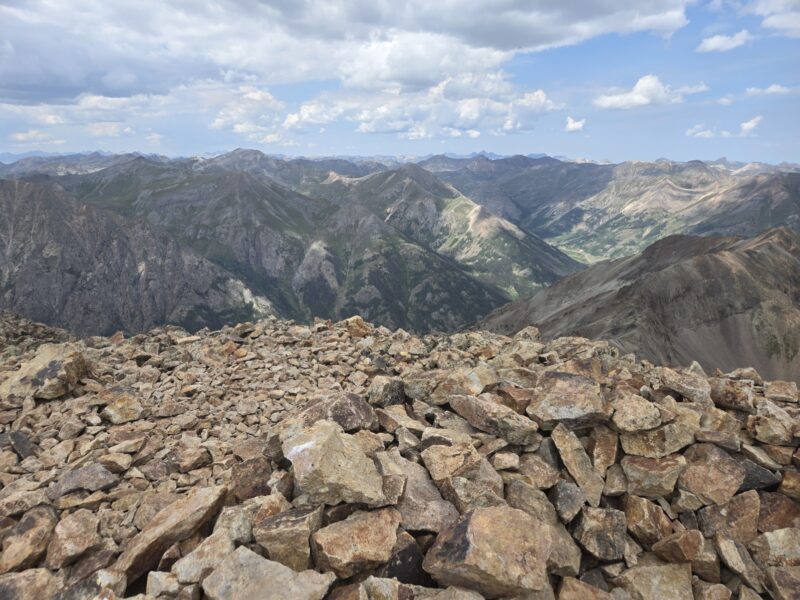
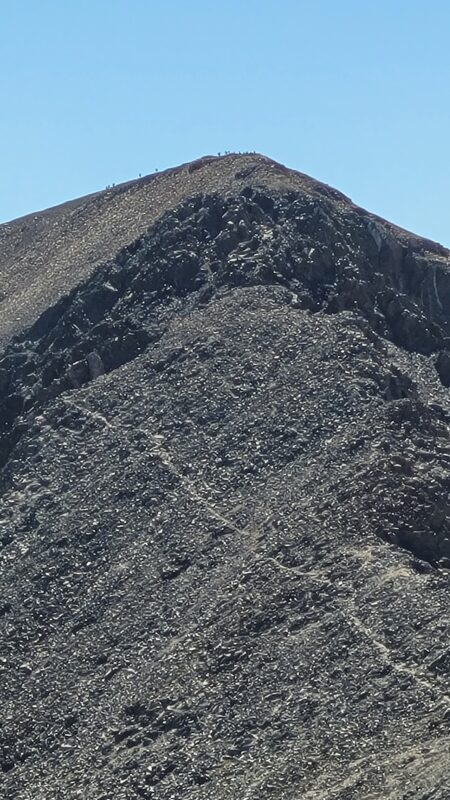
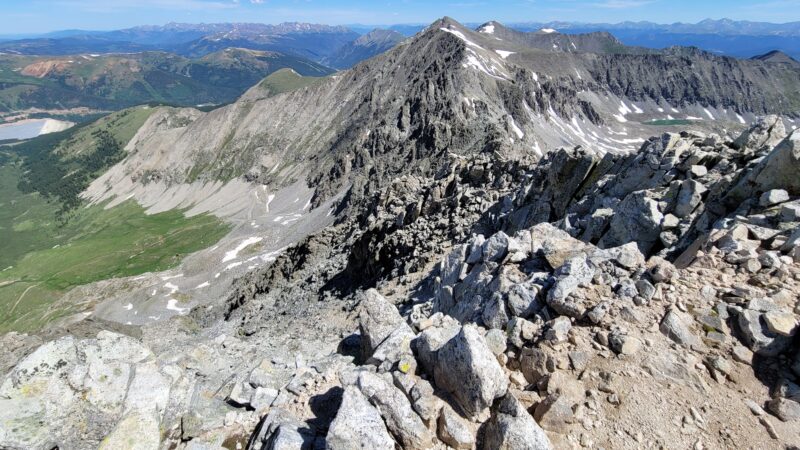
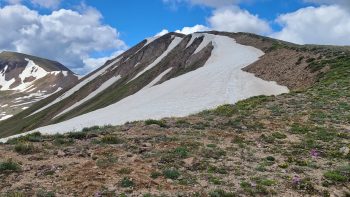
Once you get up to the false summit you can see the last 100+ ft of the climb. It looks kind of cool with all the red dirt and rocks, and you can look back towards the saddle for a cool view. Honestly you can look anywhere and you have amazing views. This is a really awesome peak. The big image is the remaining route. You are at about 13,900 feet here and have hiked about 4.25 miles.
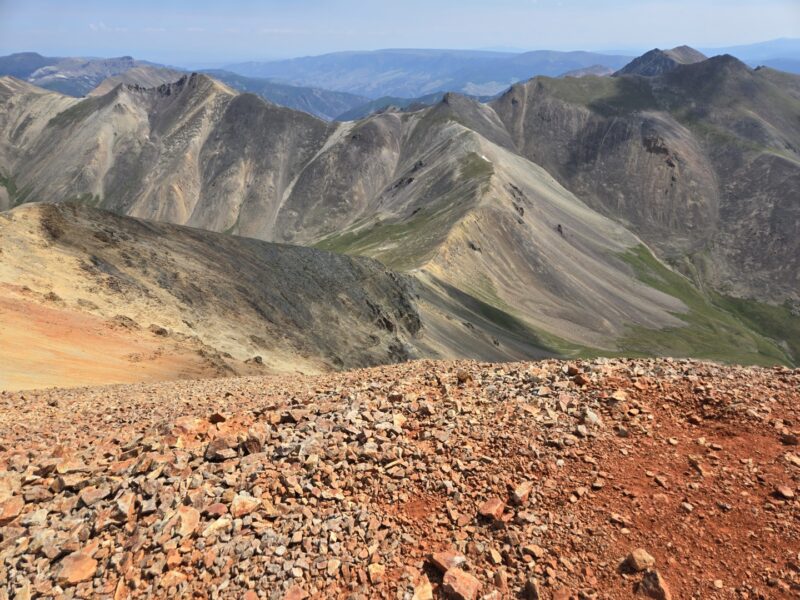
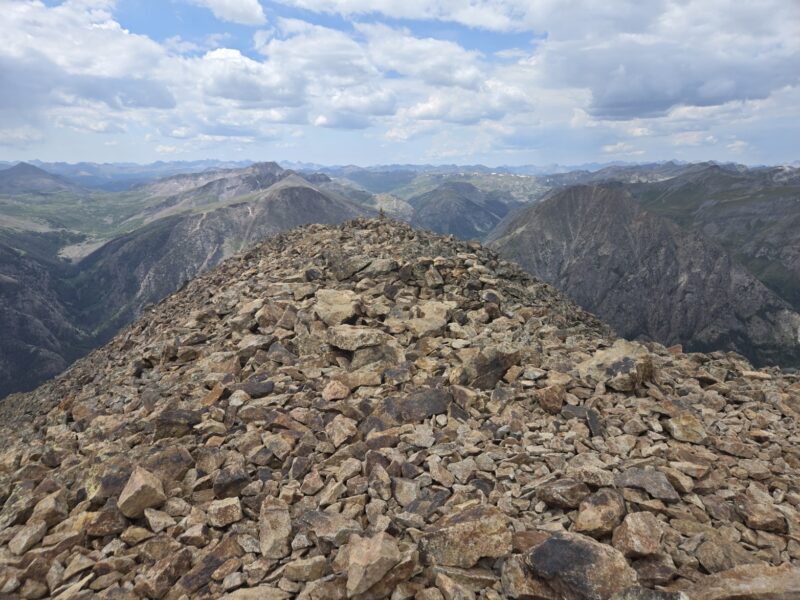
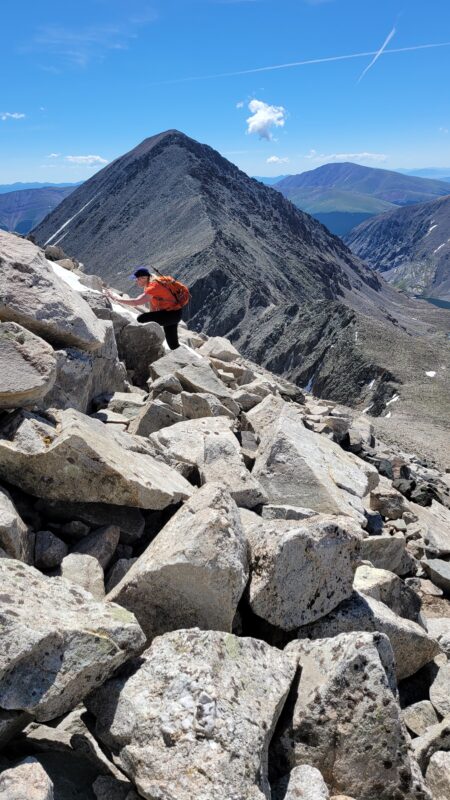
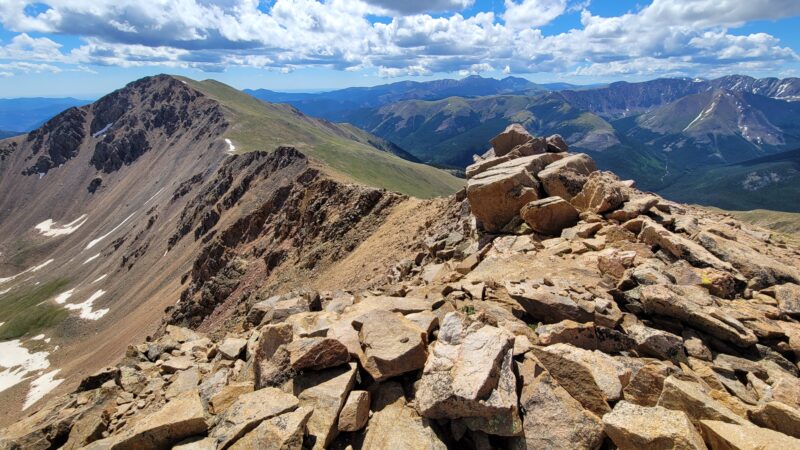
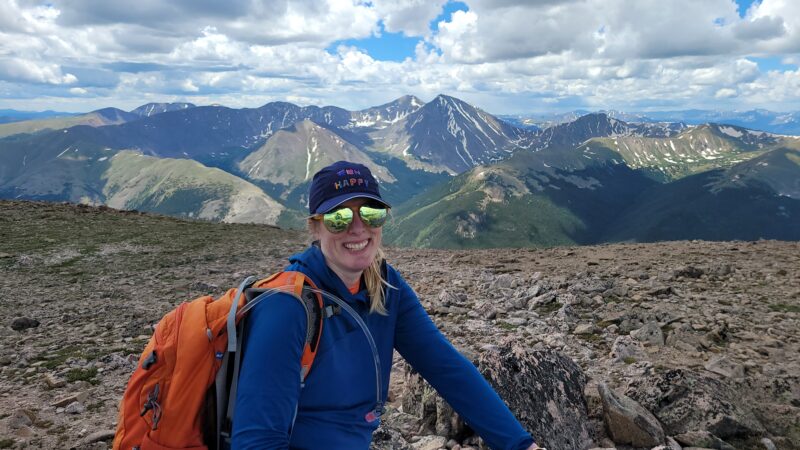
The summit was so red! It was really cool. I could imagine how on a foggy and cloudy day if you just saw that red up in the sky it could look like a red-cloud. The summit has a little rock shelter but not much else. It is flat and not very rocky, easy to walk around. You can see the route to Sunshine from here, but part of the route is obscured by a hump in the middle of the route. But I do have a picture with Allyson that shows Sunshine in the background (top left and top middle show Sunshine). It took us about 3 hours and 30 minutes to summit Redcloud with breaks, which covered 4.5 miles and about 3,700 feet of gain.
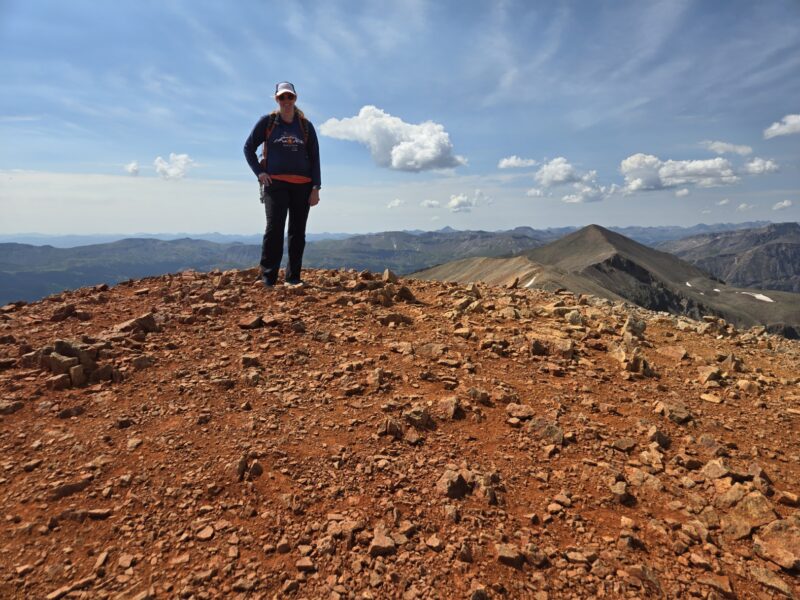
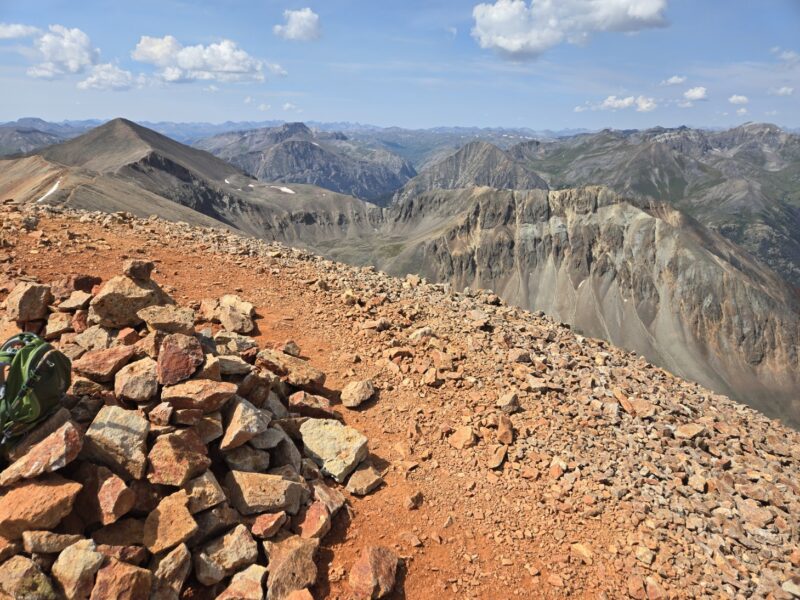
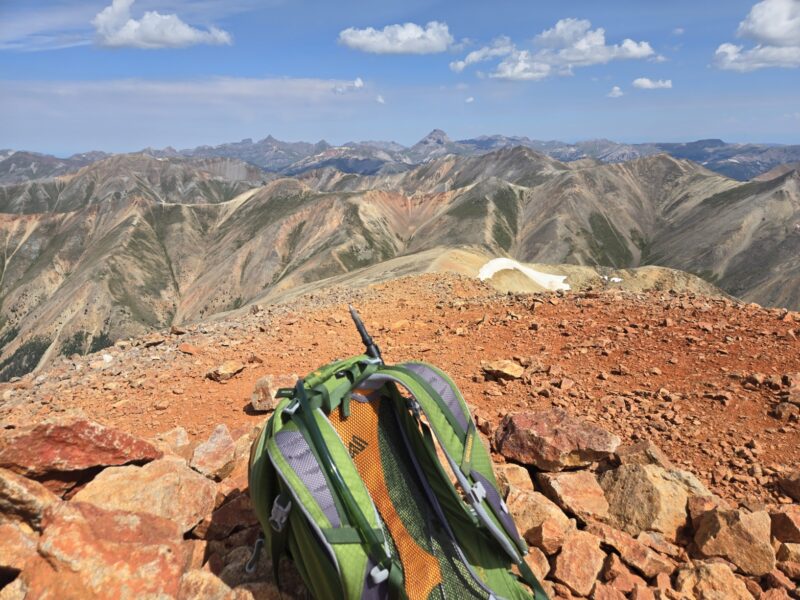
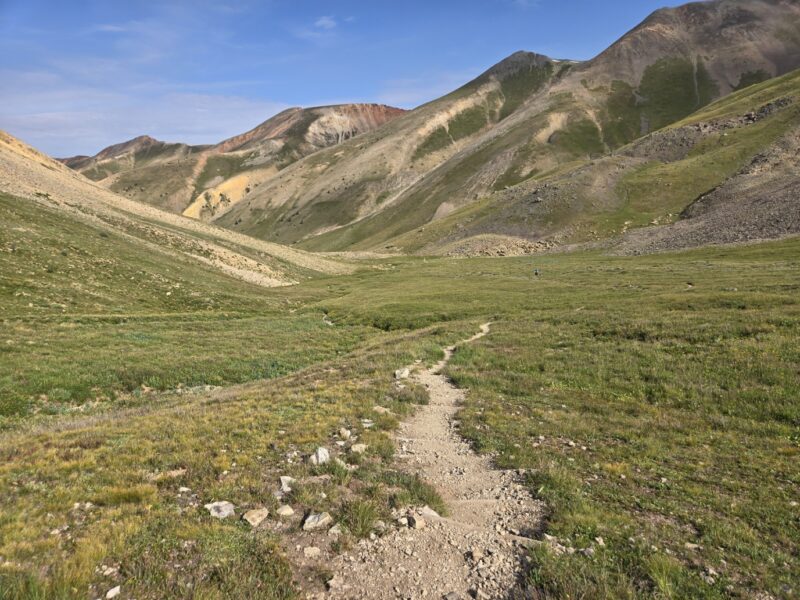
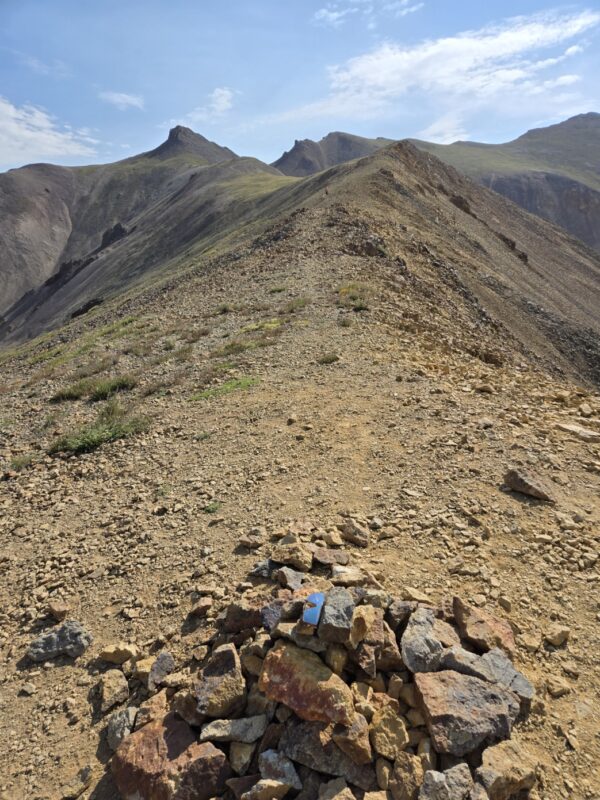
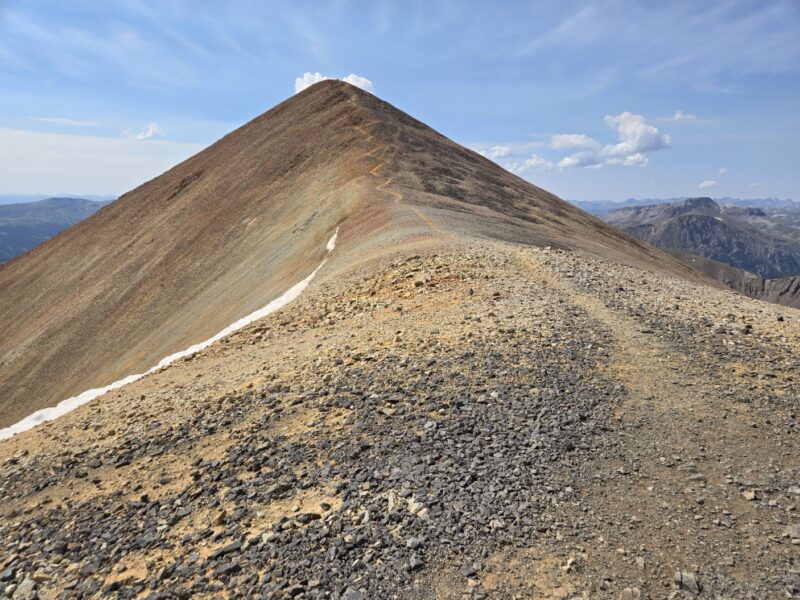
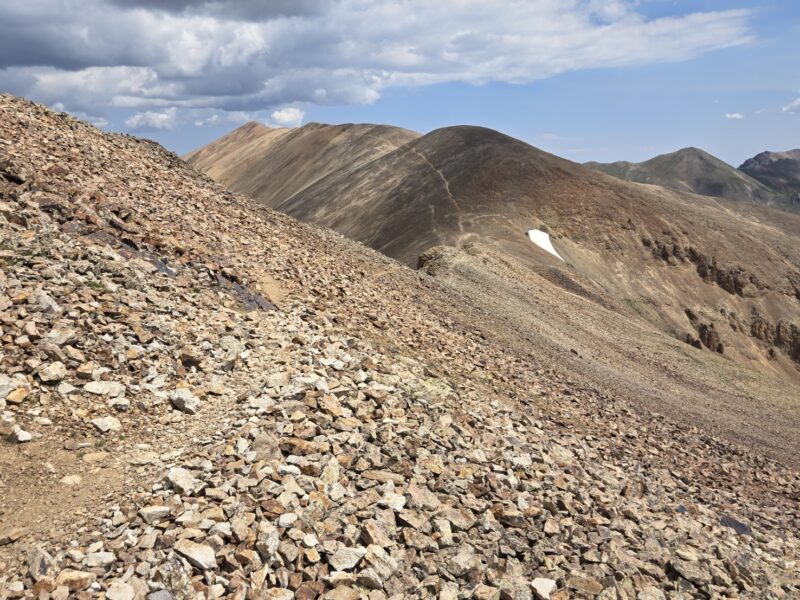
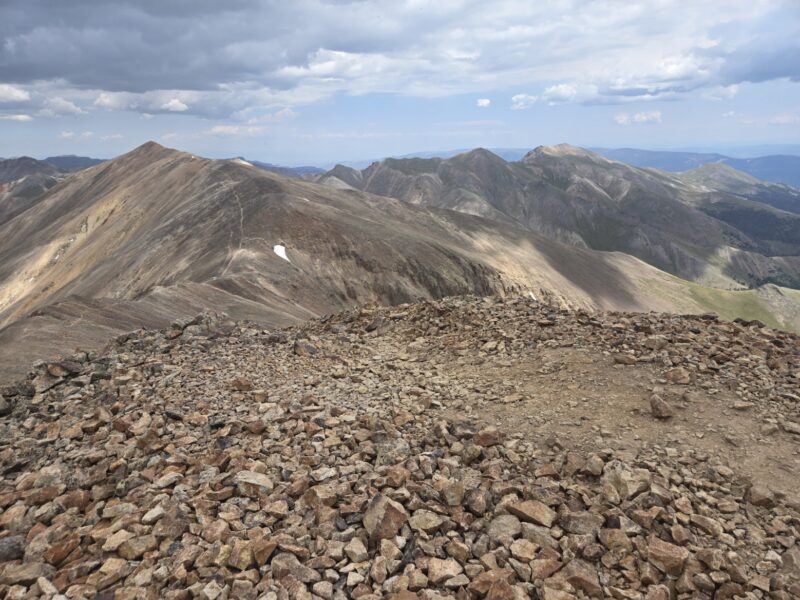
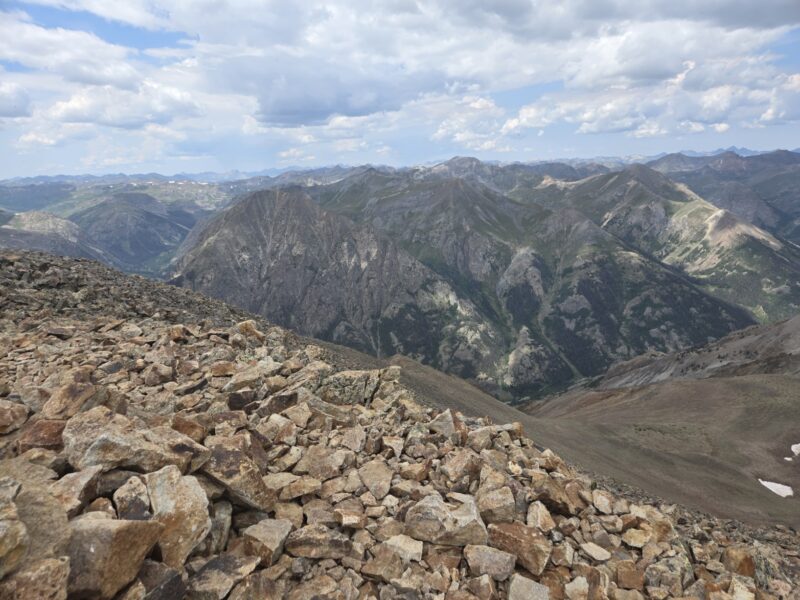
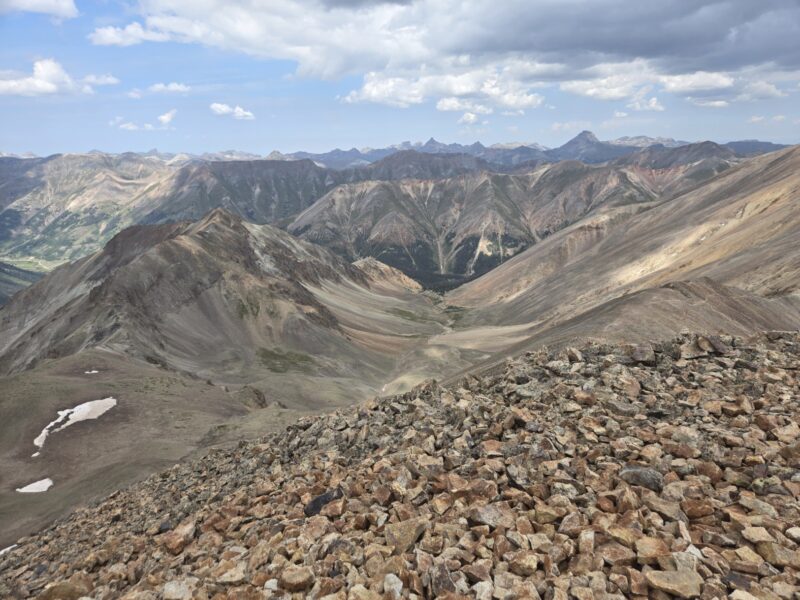
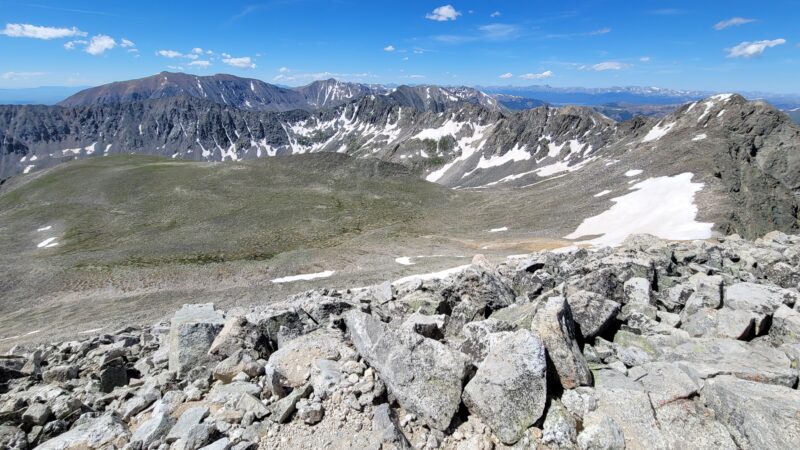
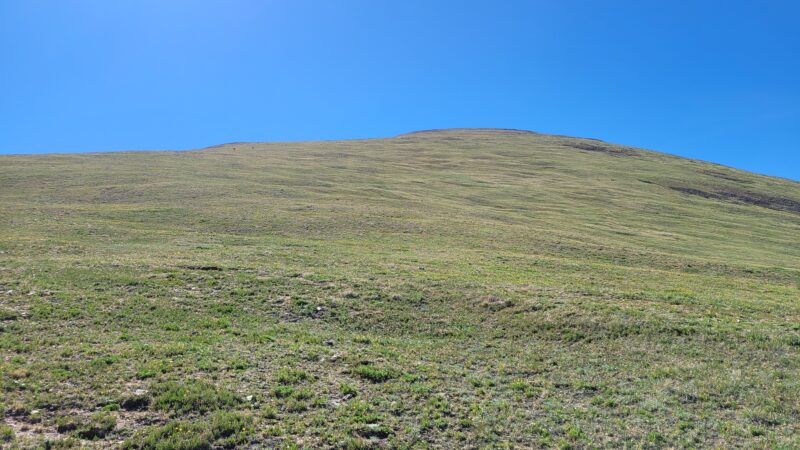
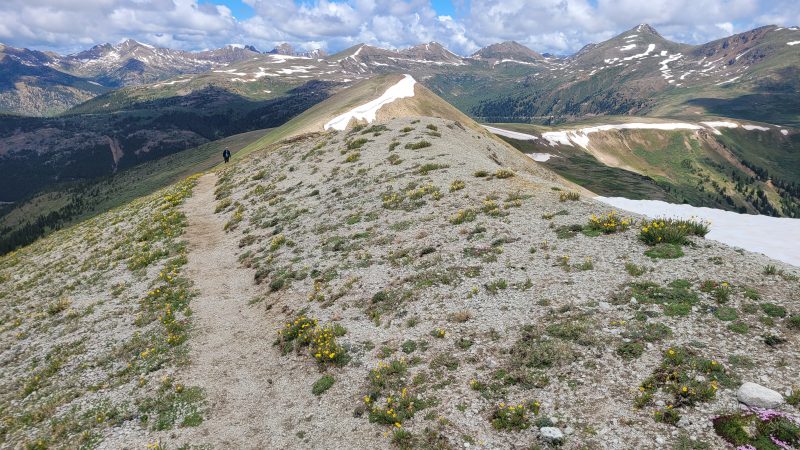
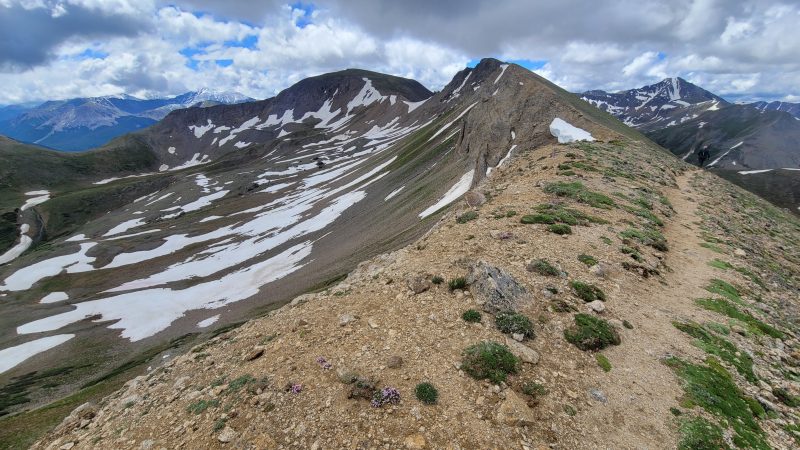
From here the trail is pretty clear and is class 1 hiking — albeit at 14,000 ft. We were feeling pretty strong and the weather looked good so we decided to go for Sunshine. I will say that headed up to Sunshine I realized I was feeling pretty fatigued, and wondered if I had made a mistake! The ridge hike over to Sunshine is a little rocky at points, but never exceeding class 1 in my opinion. It is 1.5 miles one way and adds 3 miles and 1,100 feet of gain total. I am going to post some images below of that section. Since it’s easiest I think to see the route from Sunshine I’m going to post some shots in order looking back towards Redcloud along the hike. The first image is closest to Redcloud and so forth until you get to the big one which is looking back from the summit.

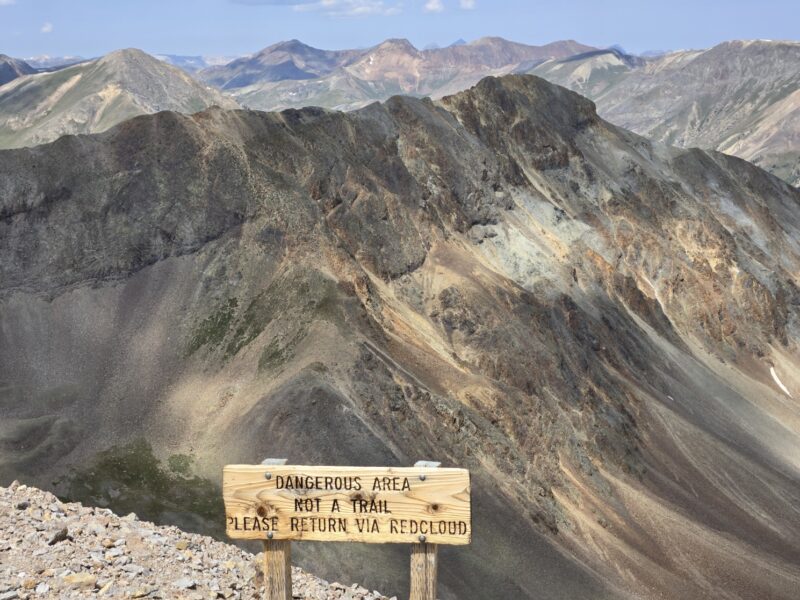
When you get to the saddle between Redcloud and Sunshine there is a sign that tells you not to descend the gully. Don’t descend here, if you want to make a loop then check out the notes further down. I’ll put a pic of the sign with a cool shot of Sundog (a 13er) in it.
The summit of Sunshine was nice, but not red at all. Just shows how dramatically different summits can be even when their neighbors. You can see Handies off to the northwest and Uncompahgre to the north. Below are a few pics.
On Sunshine Peak we noticed some clouds rapidly forming, and it was around noon, so we hustled on back to Redcloud (the weather folks were saying chance of storms maybe after 3pm but probably more like 6pm). The hike over to Sunshine and the hike back to Redcloud took almost exactly an hour each — so maintaining about 1.5 mph with breaks. Once back on Redcloud, we opted not to linger too long before making our way to the 13,000 foot saddle. However, as discussed above about the route finding heading up/down from the false summit, we turned too quickly and ended up on a very steep and nasty segment. However, back at the saddle point we felt we were in pretty good shape and were feeling more energized after eating and drinking a bit.
Naturally, once turned around on Sunshine the rest of the hike was just the first part but in reverse. You can make this a loop, but it is reported it is much harder and can get you into trouble if you don’t know the route well. To make it a loop, you’d take the Northwest Face route, which is described on 14ers.com, either down from Sunshine or to summit Sunshine. I’m thinking I’d want to try summiting Sunshine first, then hiking to Redcloud, and then going down the standard route. But hikers do it in reverse. I do have an image that I marked up to show which gully you’d drop into (14ers has much more information on this so I’d go there if you plan on doing this route).
There is somewhat of a trail down Sunshine to the West that leads to the flat section you see in the image. There is a trail that leads over towards the ridge with the x’s and checkmark. You want to find the gendarme between the checkmark and the big x and hike down to the right of it. If you’re coming up you’d hike up to the left of it. The green line/arrow shows the route to go to Sundog Peak, which is a 13er.
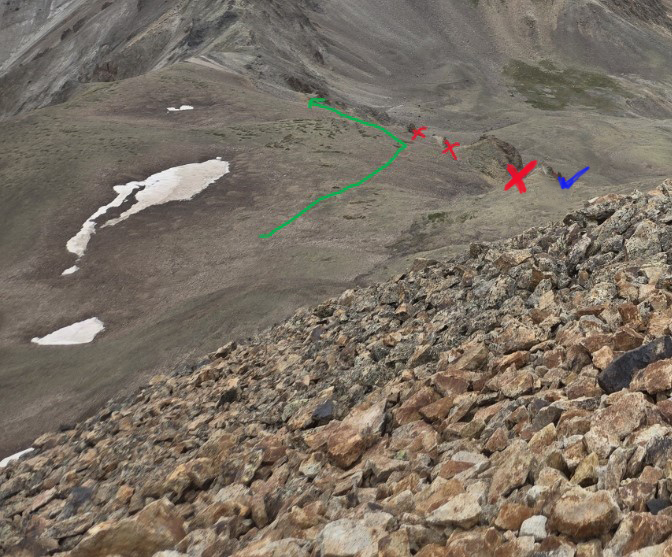
Given that we haven’t done this route. I’d go to 14ers or another site/trip report for more info. But since I was looking at it thought I’d post this pic and mention it as a possibility.
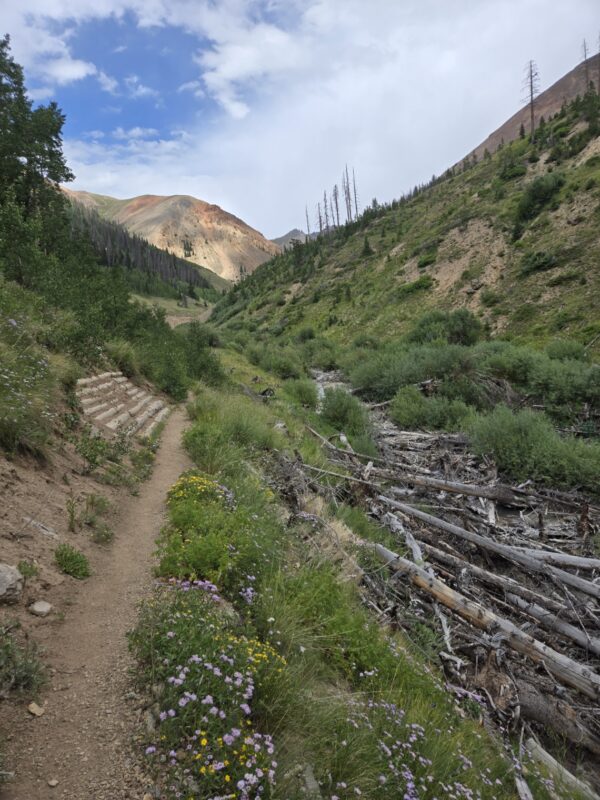
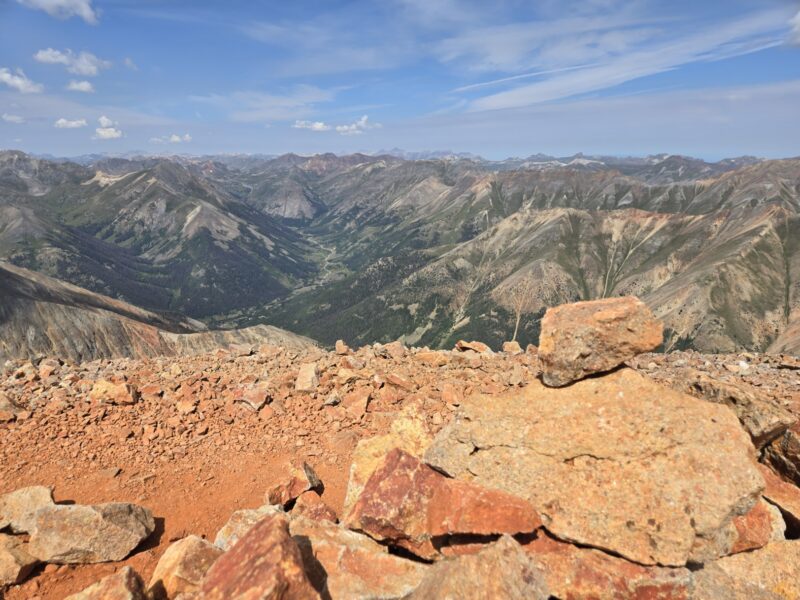
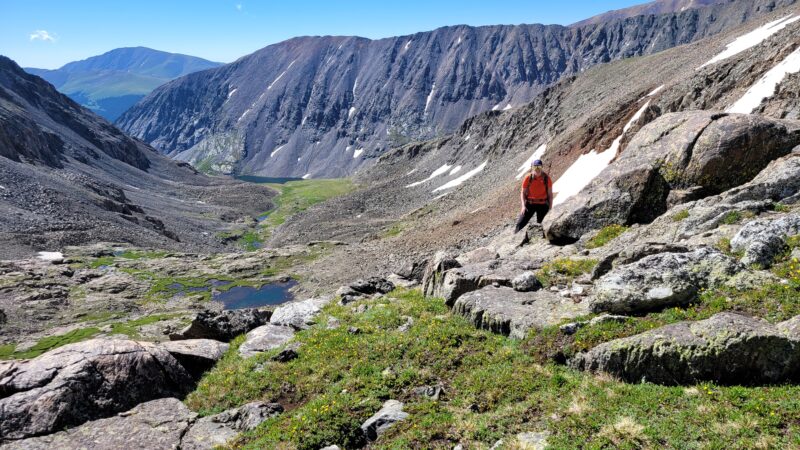
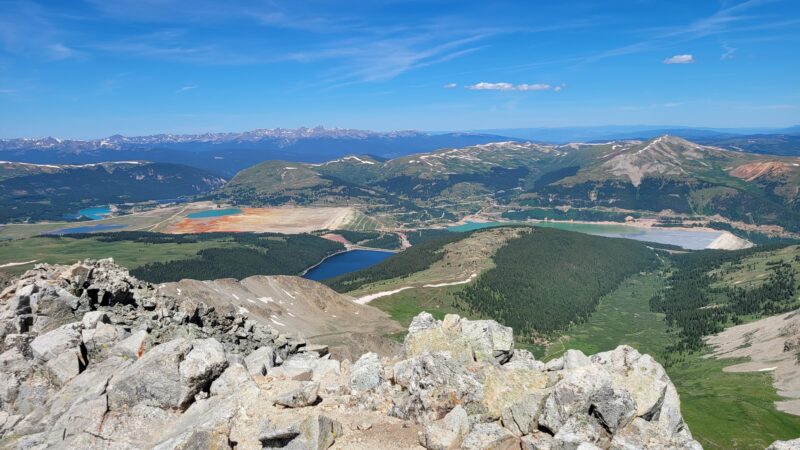
Alright, so we had reversed it and headed back. Unfortunately for the area it did not rain, despite threatening clouds. We noted that the water towards the top (above maybe 12,000 feet) looked pretty clear, but that lower down it looked like it was polluted potentially with mining run-off. I’m not sure how safe it is to drink (luckily we were good on water). I want to post a few nice pics below to showcase the hike.
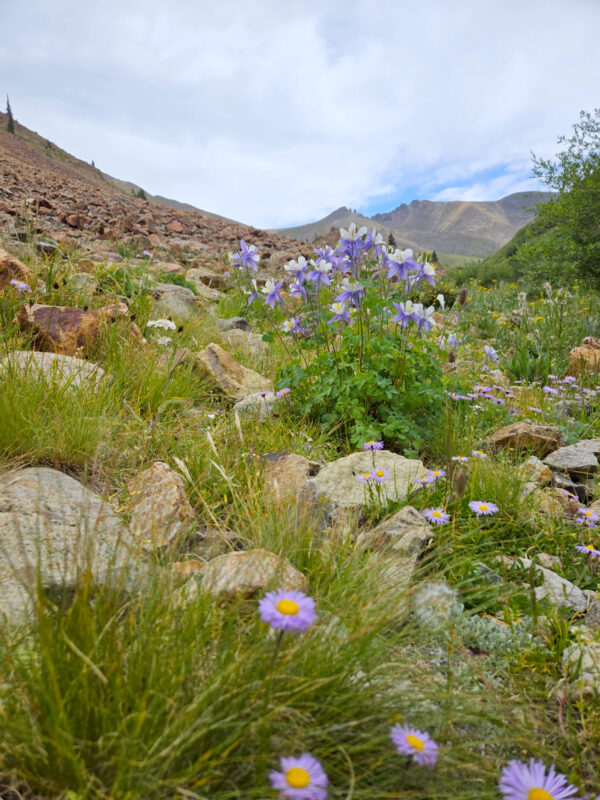
Really beautiful columbines on the hike with mountain daisies.
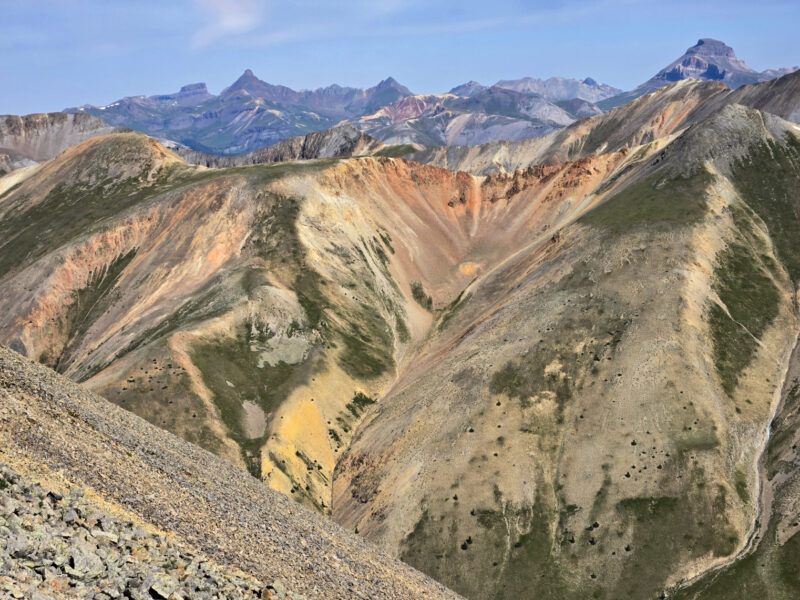
Just such a cool vista with Uncompahgre in the top-right corner of the image. Taken near the false summit of towards Redcloud.

Highlighting the vivid colors on the hike. Taken near at the summit of Redcloud.
Thank you for reading. Our GPS lost us at a few points and at a particularly long section near Sunshine Peak. So the stats are based on 14ers and my own estimates. Be safe and have fun out there!
Fletcher Mountain (13,951 ft)
The allure of standing atop 14,000-foot peaks and sense of accomplishment at reaching each one in Colorado remains a goal for us though our perspectives have shifted over the last several years. Popular trails have become even more popular, and nearly impossible for seeking solitude or a trailhead parking spot for that matter. It’s been interesting to see the world trade the routine of daily commutes, happy hours and Netflix in favor of more adventures in the great outdoors. Though it is clearly a positive direction for our country to collectively share love and respect for these diverse ecosystems, overuse is inevitable and even heightened when leave no trace isn’t practiced. Reservation systems have been put in place and fees increased for many national parks and even some 14er parking (looking at you Quandary) in the hopes of managing more of the crowds though this is not without many issues including the loss of freedom and spontaneity but more importantly the development of access and equity concerns.
One way that we can help mitigate some of the overuse of popular areas is expand our areas of interest and explore all the nooks and crannies around us. We have started to transition our weekend adventures to trail running in less popular trails or exploring the hundreds of other majestic peaks under 14,000 feet that this state has to offer. In fact, there are 583 ranked peaks that fall between 13,000 and 13,999 feet in Colorado making seemingly endless options for varying degrees of adventure and solitude.
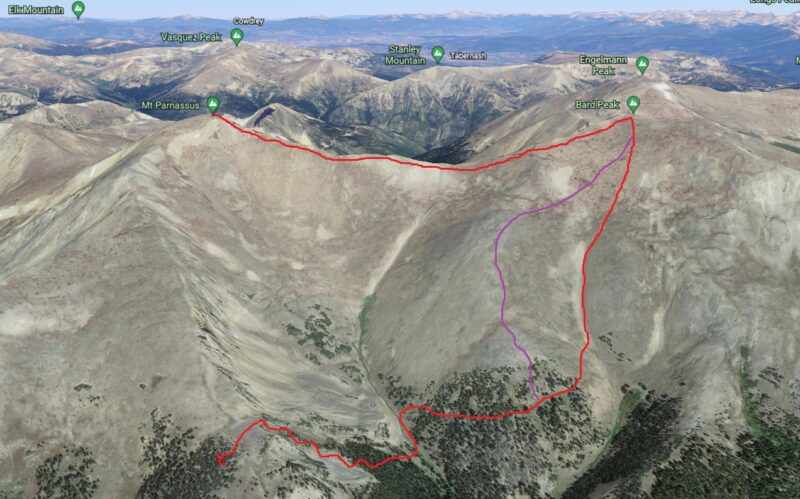
On July 9th , we decided to finally make our way up a nearby centennially peak in the Tenmile range, Fletcher Mountain, which sits majestically at 13,951 feet above sea level — a mere 49 feet from 14er status but therefore not on as many checklists. We decided to climb the class 2 southeast ridge of the peak which begins at the Blue lakes TH right next to the dam (seen above). Parking access at the Blue lakes TH is currently fee and reservation free allowing us to base our decision to climb on the predicted weather and our energy levels that day rather than whether we committed to something on the internet weeks ago.
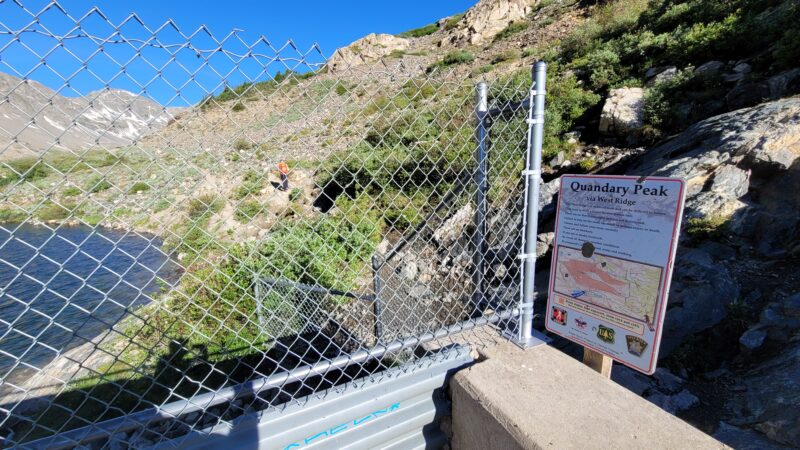
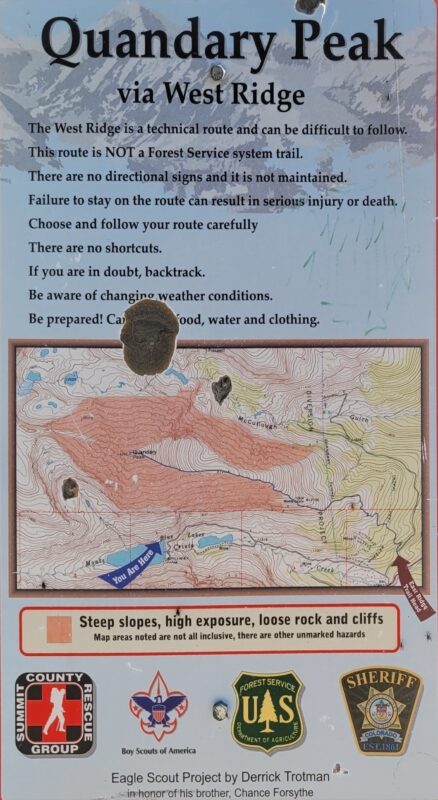
Trip reports we read promised us a short day and easy climb, but if there is one lesson that we have learned over the years is that everything is relative, and conditions can be quite different from month to month or even summer to summer. To start, our day began at the lower parking lot, because to our surprise, the gate to the upper large parking lot next to the dam was still closed despite summer conditions in and around the lakes. The extra hike up the road to the dam was only 0.6 miles (one-way) and around 350 feet of elevation gain, but already extended the day slightly longer than we had planned. Once we reached the dam, we followed a rocky path up and around the right side of the dam, passing by the warning sign for Quandary Peak’s West Ridge Route. This is a Class 3 exposed route up the famous 14er. Despite the extra challenges of this route, we suspect it might be gaining popularity as there is no reservation required and free parking.
We quickly followed the trail and traversed rapidly up the west slope and found ourselves high above the lake within 10-15 minutes of steep hiking. Be cognizant and follow the upper trail rather than the lower social trail that follow the lakeside. There is a trail restoration sign by the trail that incorrectly leads by the lake. We went the wrong way on a hike here several years ago and ended up bushwhacking up a steep scree slope to regain the appropriate trail. One thing to note about this hike, is that it is all truly an alpine experience. The trail begins above tree line at around 11,700 feet and quickly gains elevation making most of your day spent very high in one sense of the word.
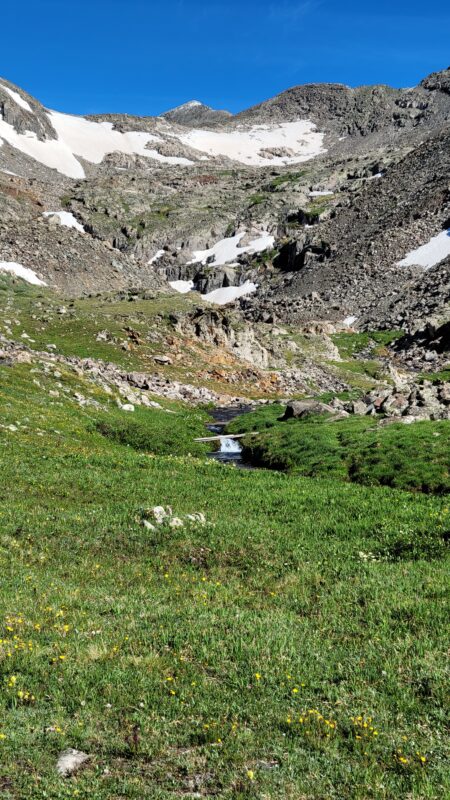

Once above 12,000 feet, the trail begins to angle northwest leading into a verdant basin, also known as
the Monte Cristo gulch. One thing we noticed about this hike was the abundance of water. Creeks
flowed everywhere, with the trail seemingly weaving in and out of rushing snowmelt. We carefully rock-
hopped over streams and deep mountain pools. There was some remaining mud, but nothing too
unmanageable. As we gained elevation in the basin, we also passed by some old mining ruins.
The skies remained a brilliant blue with very few clouds in sight as morning progressed along. We
continued hiking a wonderful trail through the basin as views began to open of the gully in front of us
with Fletcher Mountain peeking out above all. Once we reached the gully, the trail sort of slowly
dissipated, and we had to spend a few minutes evaluating our options for ascending the steep rock.
There were still several snow fields in the gully that were too steep and slick to ascend without the
appropriate gear. We initially climbed steeply up a rust-colored creek in the center of the gully before
veering left and bypassing a snowfield. This allowed for some fun scrambling among the rocks as we
ascended higher. Carefully test all holds or talus before stepping as much of this rock was quite loose.
We did note several cairns as we made our way up the gully, but there were plenty of different options
for gaining the ridge allowing for variation in the effort and difficulty of this climb.
After much rock hopping, we veered west and exited the gully/basin around 13,100 feet which we noted was marked by a large wooden stick that proved quite useful for guiding us during the descent. Fletcher mountain was now in full view before us and to our dismay, appeared to be a large, very steep pile of rubble. We headed the obvious direction towards the southeast ridge of the peak gaining minimal elevation (roughly 100 feet) as we navigated uneven, rocky terrain on a large plateau. Unfortunately, we didn’t take the most straightforward path up the peak following the ridge, but instead tried to head straight up the south face. This didn’t save time and we soon found ourselves in a talus nightmare, climbing and hopping very large boulders, many that were not very stable. Eventually, we reconnected
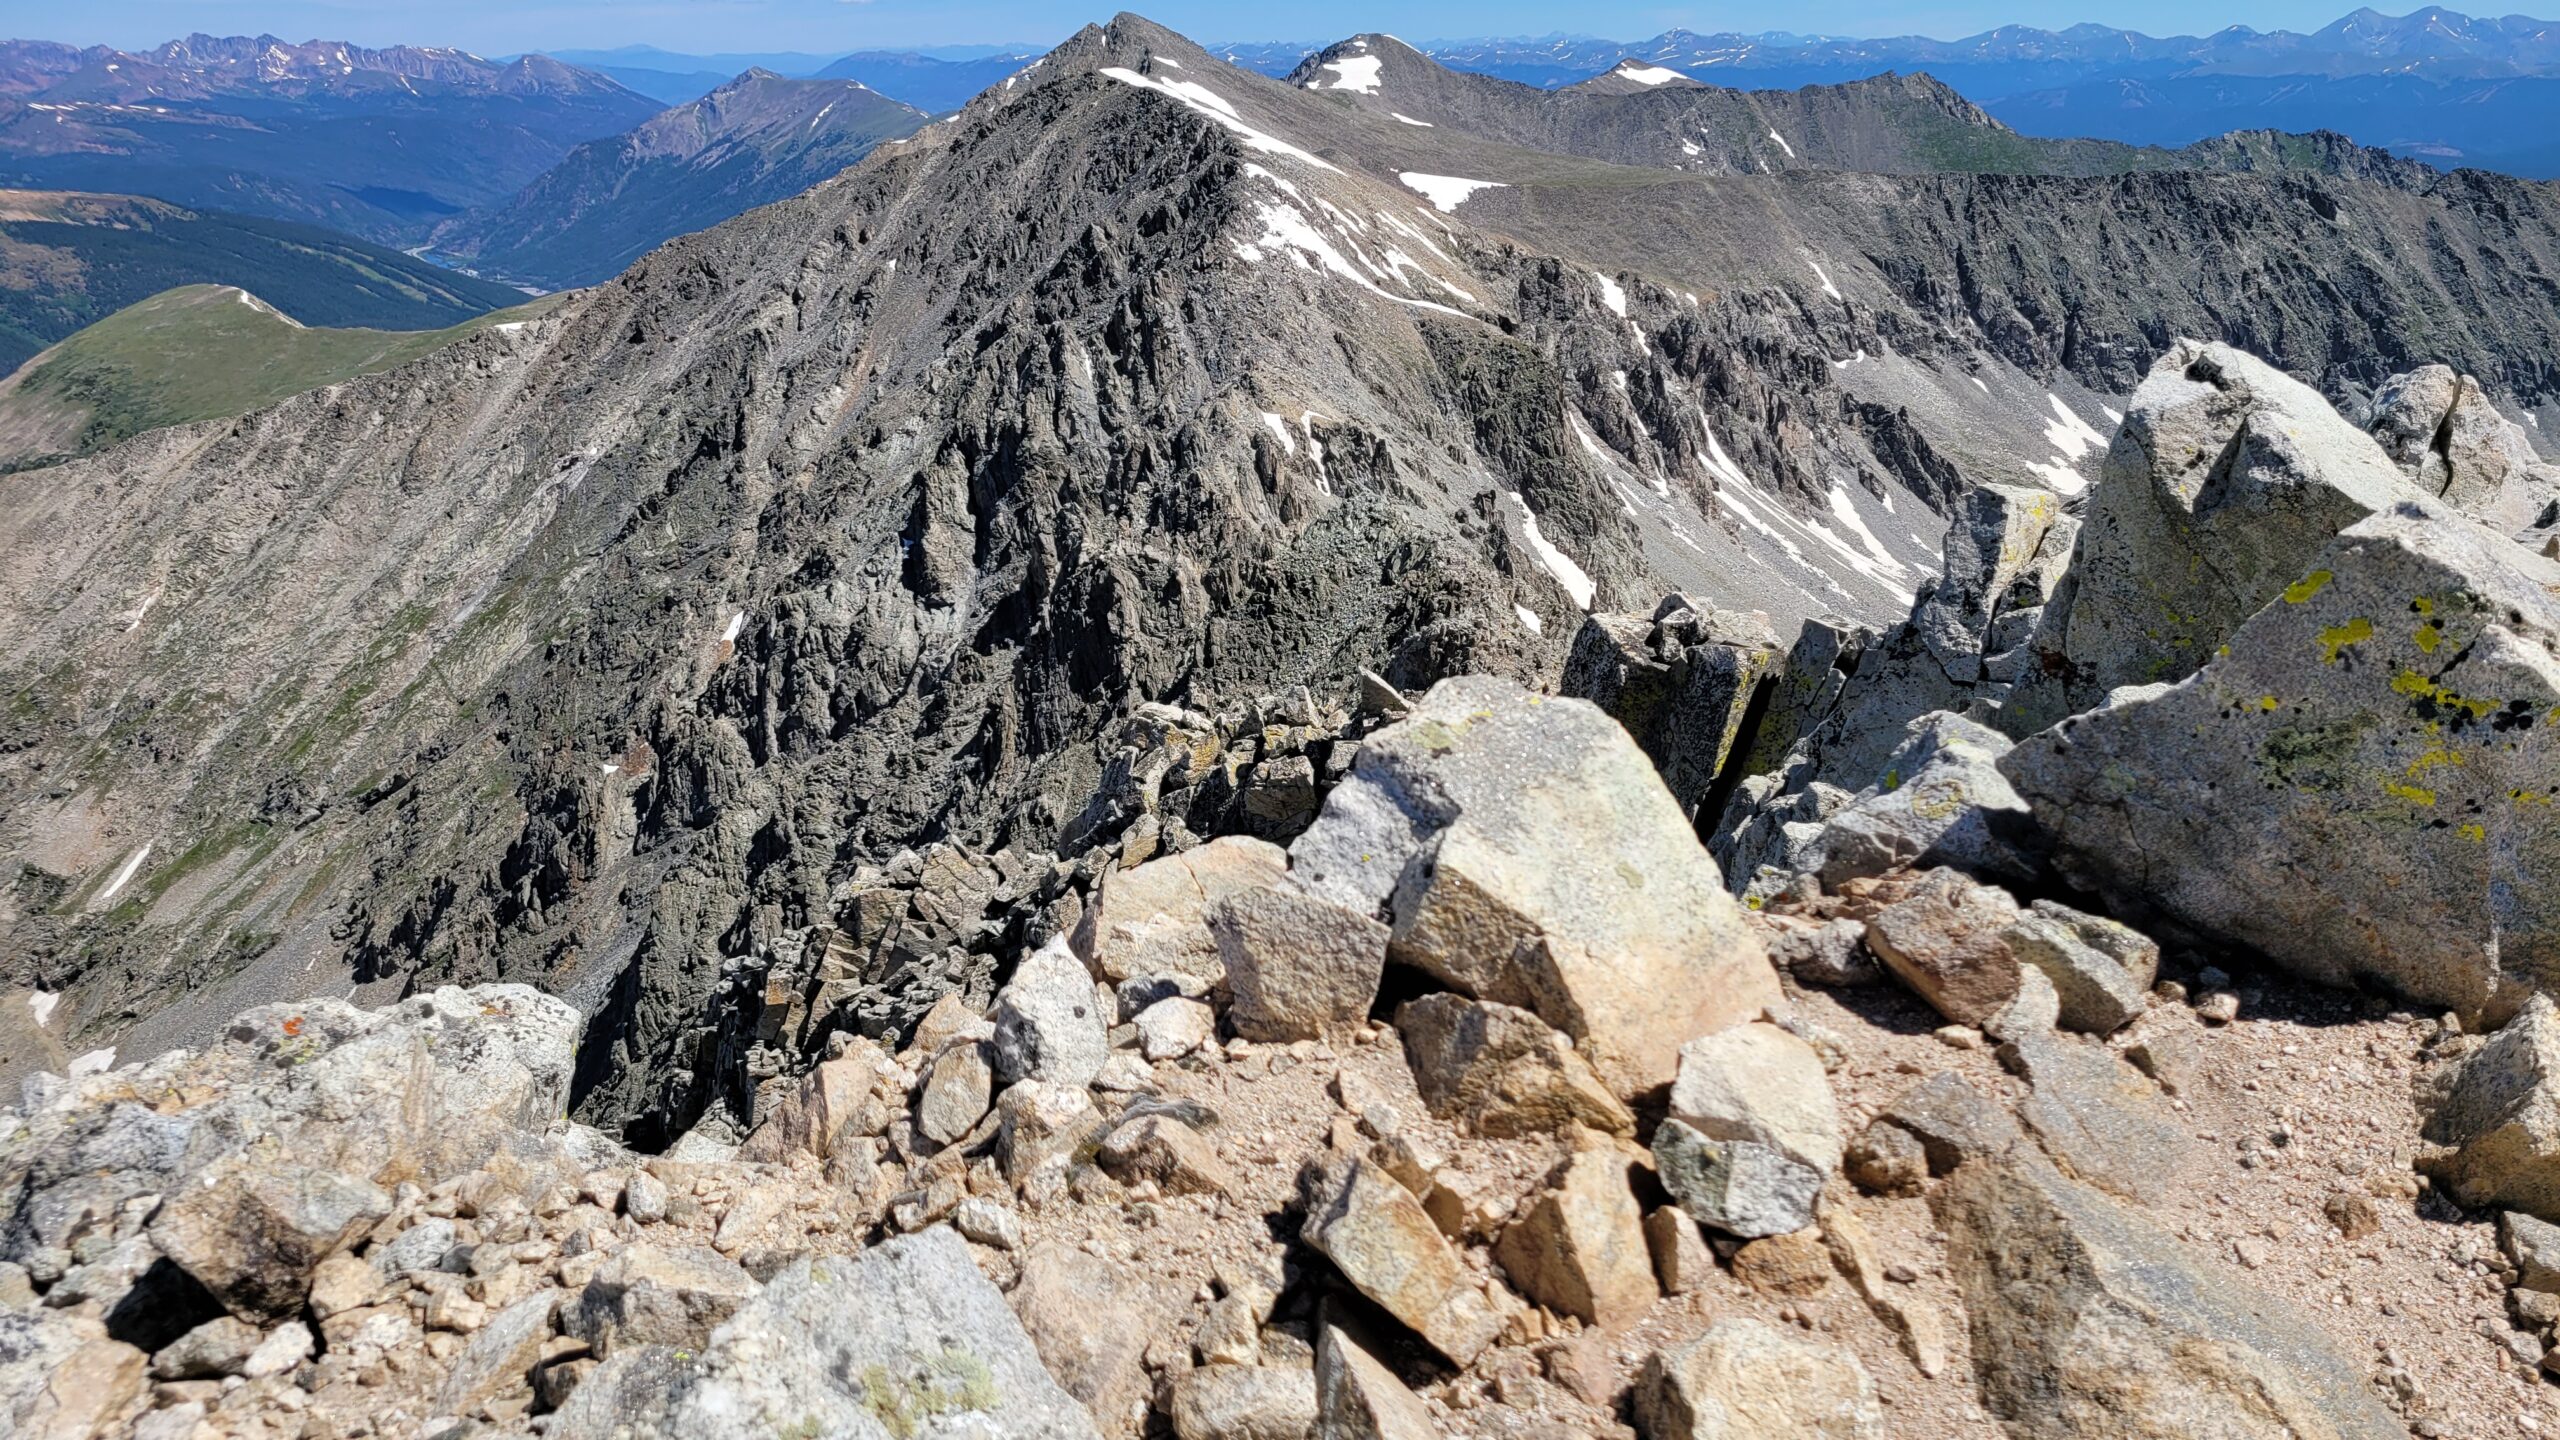
with the ridge only to discover it was covered in a slab of snow just shy of the summit. Here, we downclimbed a little to avoid the snow, adding a little more work to our summit adventure. Despite our heavier than needed workload, we made the summit and enjoyed spectacular views of the Tenmile range including Quandary Peak, Atlantic Peak, and the impressive east ridge over to Pacific Peak that we climbed last year. The basins and gulches were still holding some snow alongside their fresh wildflower blooms and alpine grasses making for an impressive explosion of colors.
There was no one that we shared the summit with, but we did enjoy looking over at all the tiny human
dots on the top of Quandary towards the east. After a few minutes of relaxation and snacking, we
decided to head back down. This time, we followed the ridge proper as closely as possible for our
descent. The snow just below the summit was avoided by staying slightly left of the ridge and very
carefully negotiating the rock as there were some serious drop offs below us. Once past the snow, we
followed a rough path through the large talus. While it was still rough class 2, this was a much easier
route option than we encountered on our ascent. Solitude was finally gone as we made our way down,
and we encountered a solo hiker and then a group of 3 making their way up the ridge. For perspective,
in a game of boredom on a descent of gray’s peak several years ago, we tallied 700 hikers seeking an
“adventure” and wildflowers on a pleasant July weekend. There was scarcely a moment in our descent
that we didn’t have to move the right of the trail. Though that was frightening example of overuse and
the strain on our natural resources, the number of hikers ascending Fletcher or Quandary and the few
playing in the gulch seemed to strike a good balance.
The sun was now high in the sky without a cloud in sight and beginning to bake us a bit in its warmth. Sunscreen is inevitably never applied as evenly or abundantly as needed and that was quickly become apparent as we hiked back through the basin. The cool, blue alpine streams beckoned us to dip our hats in the icy coldness for some relief. Though, thoughtfully, this sounds dramatic now as temperatures were roughly 70 degrees at the time.
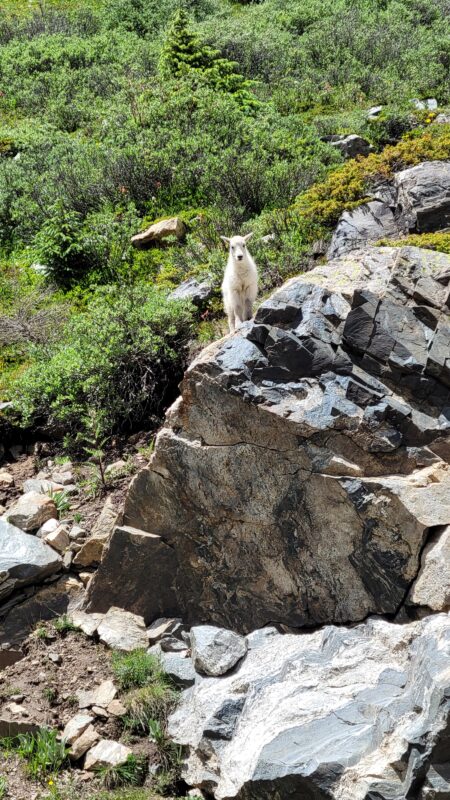
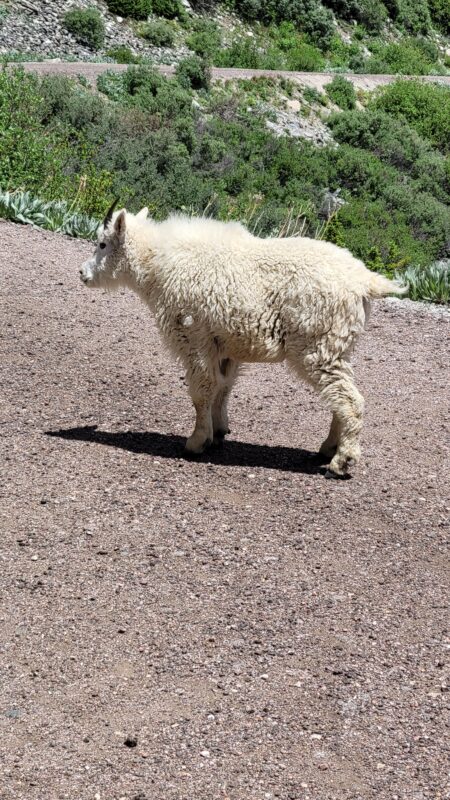
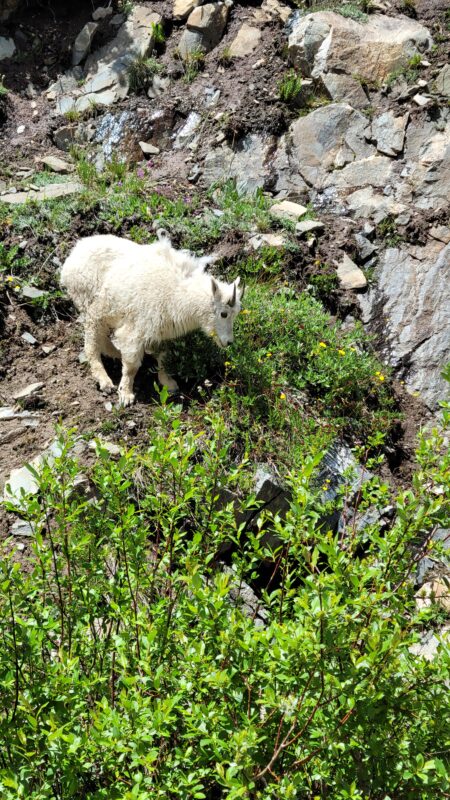
As we reached the dam, we began our walk back down the road. It was now lunch time, and many families were out and about walking up the road to view the waterfall just below the dam. Mountain goats continue to find us this summer, and today was no exception. Down the road, we encountered a group of 10-12 goats hogging much of the road including a precious baby. We were not oblivious to the protective mother and kept our admiration at a distance.
As we reached the truck, we noticed a few late comers vying for our parking spot. Popularity is gaining at this TH too though an earlier start affords a spot and quiet for a while. The diet coke we had been saving was too warm to enjoy and we settled on the remaining bladder water that had been baking in the pack throughout our hike with its signature plastic flavor. Once in town, we made our way to Breckenridge Brewery for lunch. Oddly enough, on a Saturday at lunch, we pulled into a rock star parking lot right in front and were immediately seated when we walked in. Guess everyone was still out on the trails. How the times are changing.
Mount Parnassus (13,574′) and Bard Peak (13,641′) from Herman Gulch Trailhead
Introduction
Numerous trip reports exist on climbing the 13ers in this range; however, there appears to be a need for a more detailed description of this particular route of climbing Parnassus from Herman Gulch Trailhead via Watrous Gulch Trail to Woods Mountain Ridge trail to a bushwhack up to Parnassus, hike the ridge over to Bard, bushwhack south from Bard to connect with Bard Creek Trail which takes us back to Watrous Gulch trail and then back to Herman Gulch Trailhead. Most of this is pretty obvious, except the descent from Bard. So, we’ll go quickly through most of this, but focus on that aspect of the hike.
Part 1
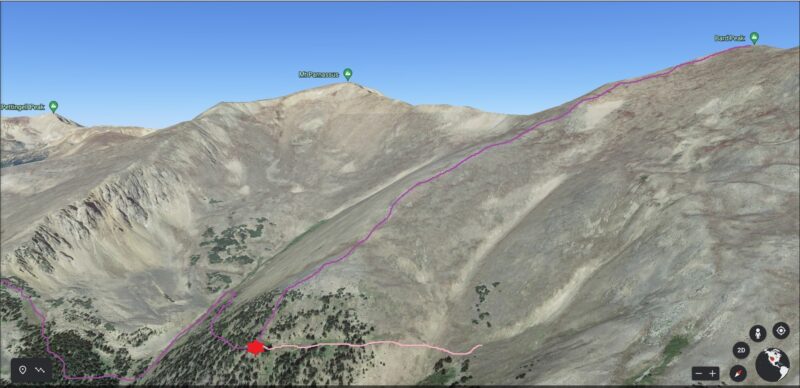
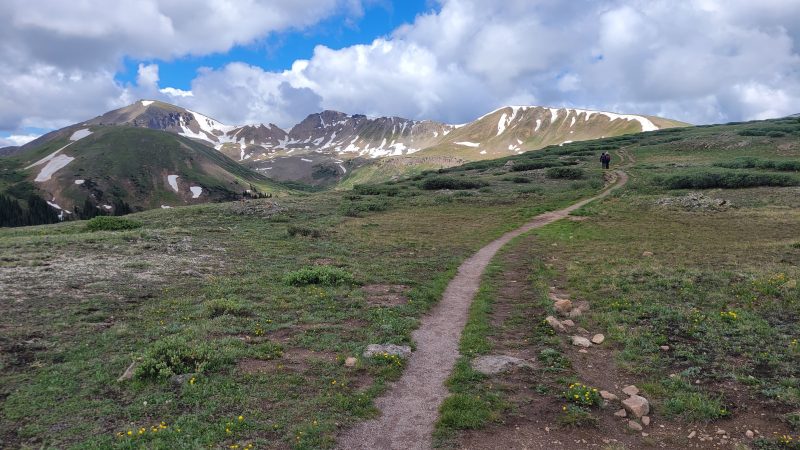
First things first. Herman Gulch Trailhead is close-ish to Denver, and thus, can be very busy. However, it is a nice trailhead with Port-o-Potties and nice parking just off I-70. From the trailhead you are on the CDT: Herman Gulch Trail very briefly before turning right onto Watrous Gulch Trail; there are signs here, the trail is large and well maintained, and it is obvious. You continue on Watrous for about 1.25 miles before reaching the Woods Mountain Ridge trail and veering sharply uphill to the right — towards an obvious saddle. It is a beautiful hike on a very well maintained trail and it has a little creek crossing with gorgeous views of the Front Range.
As you climb up the Woods Mountain Ridge trail you get some very nice views of Grays and Torreys, and we could even see the trail leading up to Grays’ summit. It is a splendid hike and there was still a nice trail that was never smaller than single track — it was pretty steep.

Saddle to Parnassus
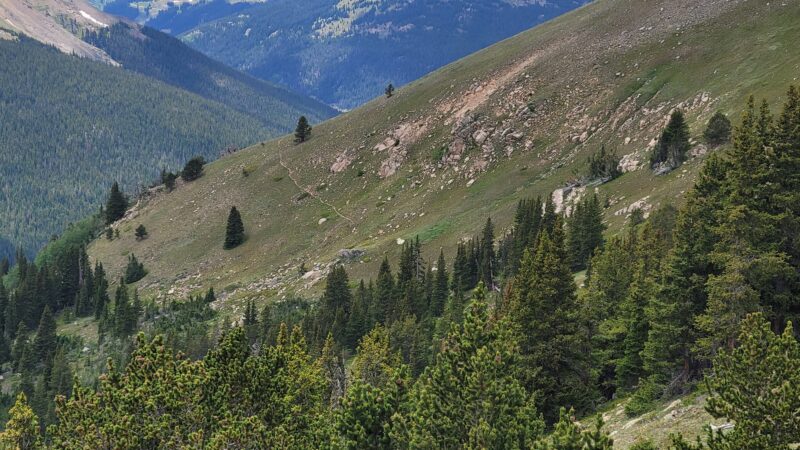
Anyways, once you reach the saddle, if you look to your left (climbers left as you reach the saddle) you will see a trail leading up to Woods Mountain (a 12er) and if you look to your right, you will see a large climb with no clear trail (see second picture below). You want to turn right and climb up to Parnassus.
Once you get up this beast, you are pretty much there. It isn’t really a false summit, per se. From here, the next route is more or less obvious (depending on conditions). You do have two options, though, on how you want to tackle Bard. You can maintain the ridge proper (which is what most people do), or you could stay a little lower and traverse around and then come up a saddle on the opposite side of Bard. If you take the second option, which isn’t as steep and is probably easier, then you do add some distance since you have to turn left once you reach the saddle and then gain the summit of Bard. Either way, there isn’t anything special to know, other than that the ridge can hold snow which can make this treacherous. There are some trails on the ridge, but they fade and you really can’t follow one trail across the whole ridge — so just pick a line and stick to it.
Parnassus to Bard
The ridge hike, as we mentioned above, isn’t that bad. And you’ll be at Bard in no time. Below are a couple shots of the hike.
You can see that there is a trail on parts of the ridge, and on other parts there is nothing. You can also see that even in July during a hot summer, there is some snow.
Choices Choices Choices…
Once you are on Bard, you have a few choices to make. Are you going to head north to Robeson and Engelmann or are you going to head back? If you are going to head back, then you have to decide if you are going to retrace your steps or if you are going to head south and try and connect with the Bard Creek Trail. We weren’t trying to nab any other 13ers, and we had seen other trip reports where the authors had climbed down Bard and connected with the Bard Creek Trail, which we thought looked nice. However, it wasn’t clear where to descend and what to shoot for, and this is where our trip report will focus some attention on our idea of how to do this. (I want to state, though, that the recommendation below is only if the conditions are similar to what we were hiking in — that is, relatively snow free.)
Bard Descent to Bard Creek Trail
First, looking south from Bard you are going to see a large ridge that connects to Parnassus to your right, a smaller ridge to the left of that with a gully/cirque between them; directly below, you will see another gully/cirque and another ridge to your left. Our recommendation is to head to that smaller ridge to your right — you can even take the ridge down from Bard a bit to meet up with it. Going straight down from Bard is not pleasant. It is steep, loose and uneven — and it is about 1,400 ft. of elevation loss before you reach the Bard Creek Trail. Below are some shots from Google Earth and from our hike that show what I’m talking about.
Bard Creek Trail does go up and over two ridges if you choose to go this way. So if you retrace your steps, you are going to regain Parnassus which is 600 ft. of elevation gain. But if you go down to Bard Creek Trail, you are going to have to do some route finding and still climb out. Up to you. But it is hard to see what you are supposed to do from this angle, so I got Google Earth out and took some screen shots of what we think is the best way down.
Bard Creek Trail to Watrous Gulch Trail
So, once you are down to the trail, you can relax a bit and then traverse around the ridge and down into the cirque/valley below. At this point, you again lose a trail, but you have cairns that do lead you in the right direction — which is just following the stream. (see below).
Eventually, you come to what looks like a camp site and just past that is a cairn that points into the trees. Take that path. From there, there is mostly a trail to the plateau.
Conclusion
All in all it was right at 9.5 miles for us and about 4,700 feet of elevation gain. As you can tell, depending on how you do this, your mileage and potentially elevation gain may be slightly different. I think this was a fun route and the descent from Bard made more of a challenge. But, it would have been nice to have better beta on this, so I hope this helps someone. I would like to one day do this again, and try the route we have proposed. If you try it out, let us know in the comments. Have fun out there and be safe.
Igloo Peak 13,060 ft. – Independence Pass
“It is not the mountain we conquer, but rather ourselves.”
Sir Edmund Hillary
Go Forth
Sometimes you just have to get out of the house, and yardwork just won’t cut it. Allyson and I headed up to the mountains with no real plans — only to get outside. We brought the tent and some supplies and we headed west. An initial idea was to go to Twin Lakes and find a campsite; but, alas, there were no campsites that we could see. The road kept on going and so we kept on following it. Eventually, we found ourselves on Independence Pass, which is the highest paved road in North America (or so I’m told).
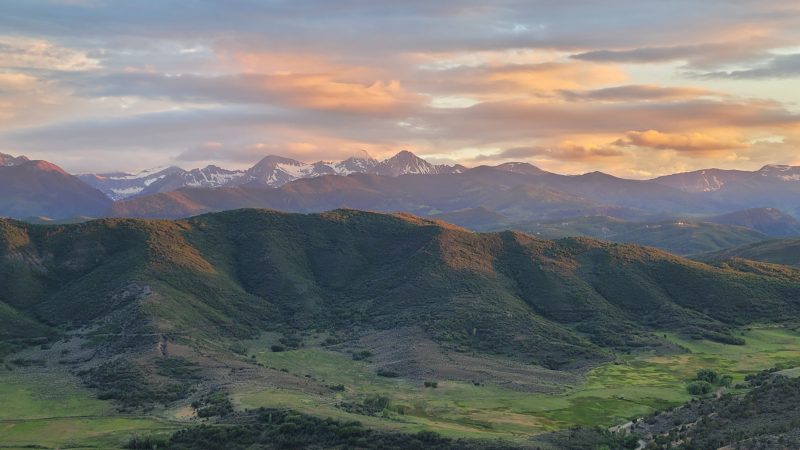
We took a quick look around and noticed a trail that ran out towards some peaks off in the distance and our minds began thinking about whether we should head out on them. However, we didn’t have a campsite yet and so had no clue where we were sleeping. We ended up in Basalt, Colorado, and at dinner pulled up the forest services maps and found a promising site. Turned out that we lucked out and found a spot on a gnarly 4WD road. Below is the view from out campsite.
Decisions
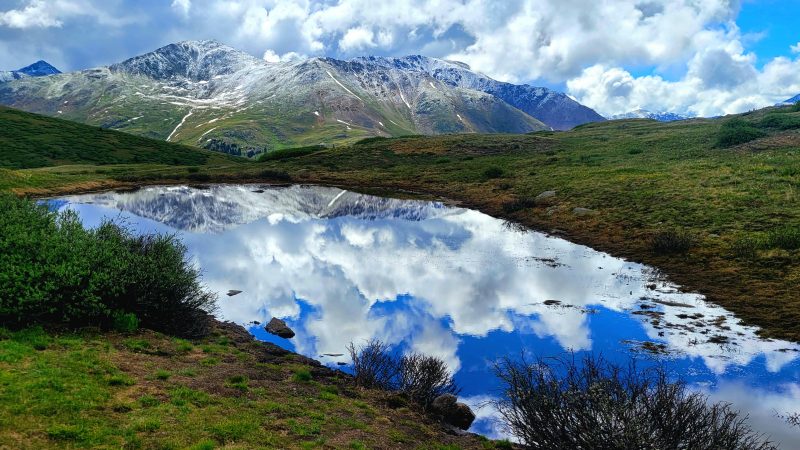
We got up the next morning and found ourselves heading back towards Denver by way of Independence Pass. In our minds we thought we might run at McCullough Gulch or perhaps paddleboard on Twin Lakes. But when we came upon the pass again we saw the title image of this post. Perfect reflections of the mountains and sky in calm waters with a freshly dusted vista of mountains. We decided that we would just run here on the trail we saw yesterday and see where it goes.
As is becoming our modus operandi we didn’t know the names of the peaks or really even if they were named. Just that they were there and we felt called to them. So, we started jogging up the trail, and it was pleasant at first. The grade was modest and there were very few people on the trail despite a very busy parking lot. But, then the climb became steeper and the elevation more noticeable. I took some pictures (below) to catch my breath.
We’re Doing This
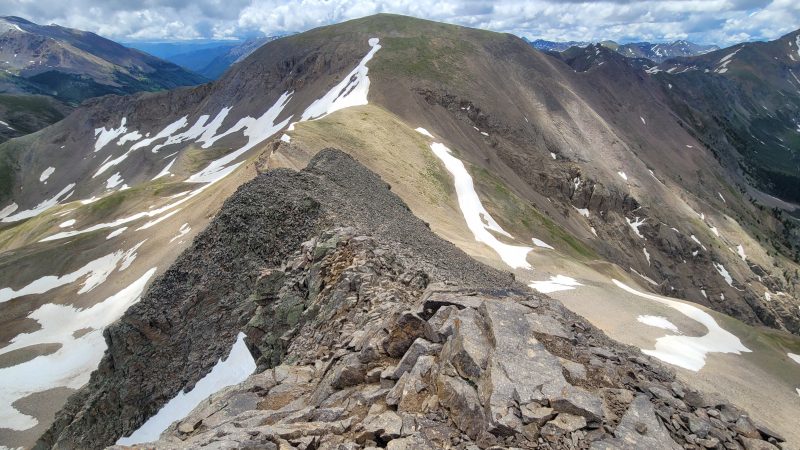
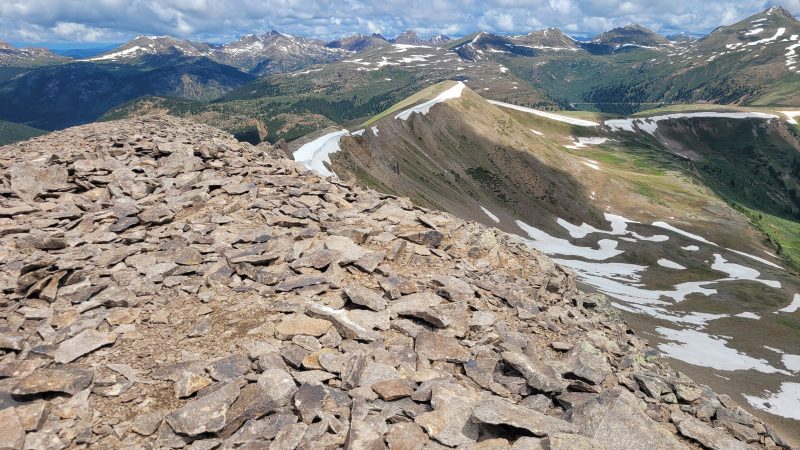
I don’t think we really had a good plan on where we were going. Were we just exploring? Were we trying to go to the middle peak? The farthest peak? No one knew. We just headed out on the trail and figured we couldn’t get lost. But after the climb up to the first summit we knew we were going to at least the middle peak, which we later learned was named Igloo Peak and was 13,060 ft. tall.
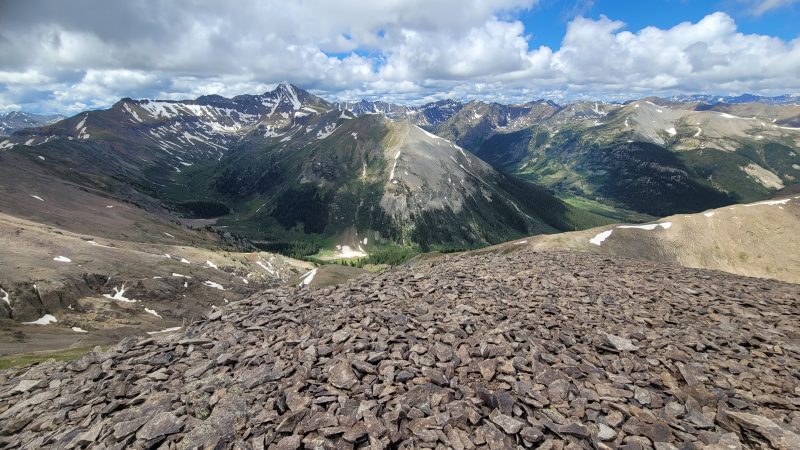
My lungs were on fire by the time we hit the steep climb up to that first summit, but we were feeling good overall. The mountains looked beautiful and the weather was cool — much better than the 100 degree weather we had a few weeks ago in Denver. There were a number of wildflowers out, mostly little blue groundcover and yellow alpine Avens, but some alpine clover and other species. Below are some images from the first section.

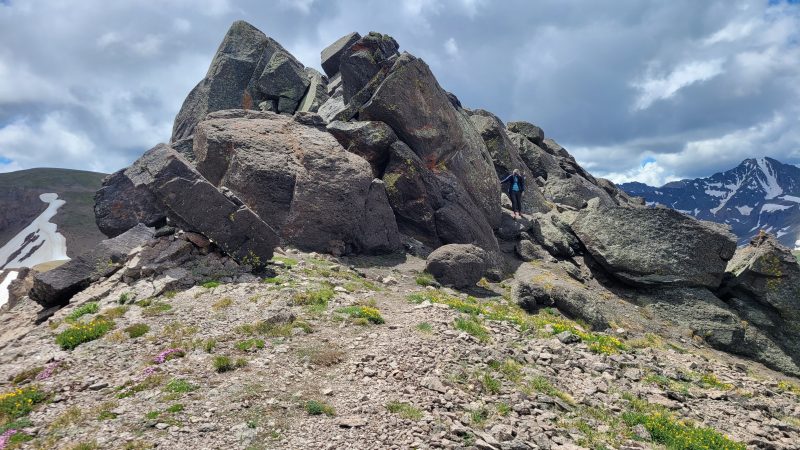
Igloo Peak
Eventually, we came to a rock tower and thought, does this go? And not only does it go, it has a trail along the backside. The trail was loose rock and scree, but a trail nonetheless. We continued on and found ourselves at the peak of Igloo. The trail, sadly, did appear to stop; or at the very least it became a tad sketchy. Later, I read that if you continue on the ridge proper to Mountain Boy it is a dangerous class 4 climb on loose rock — so I’m glad we turned back. There were other trails and we speculated, apparently correctly, that one could climb down and approach from lower down. Below are some images from the summit of Igloo and the rock tower with Allyson on the trail.
Heading Back
The jog/hike was a nice surprise; and we didn’t expect for the peak to have a name. But like most things in life, now we have even more to explore than we did before. If you go north from the Independence Pass TH there is another trail that goes to other 13ers; and we will have to come back for Mountain Boy, which we didn’t even know existed. And now we have seen Grizzly Peak (the tallest 13er at 13,988 ft.) and countless other 13ers. The area could provide weeks of exploration. Not only that…but we do have to go back and paddle Twin Lakes and explore the Independence ghost town.
So we headed back down and continued on our adventure. Overall the route is about 5 miles RT with maybe 1,300 ft. of elevation gain (or thereabouts). I’d say that over 90% of the trail is runnable, but that last section before Igloo is too loose (at least for me). Happy adventuring!